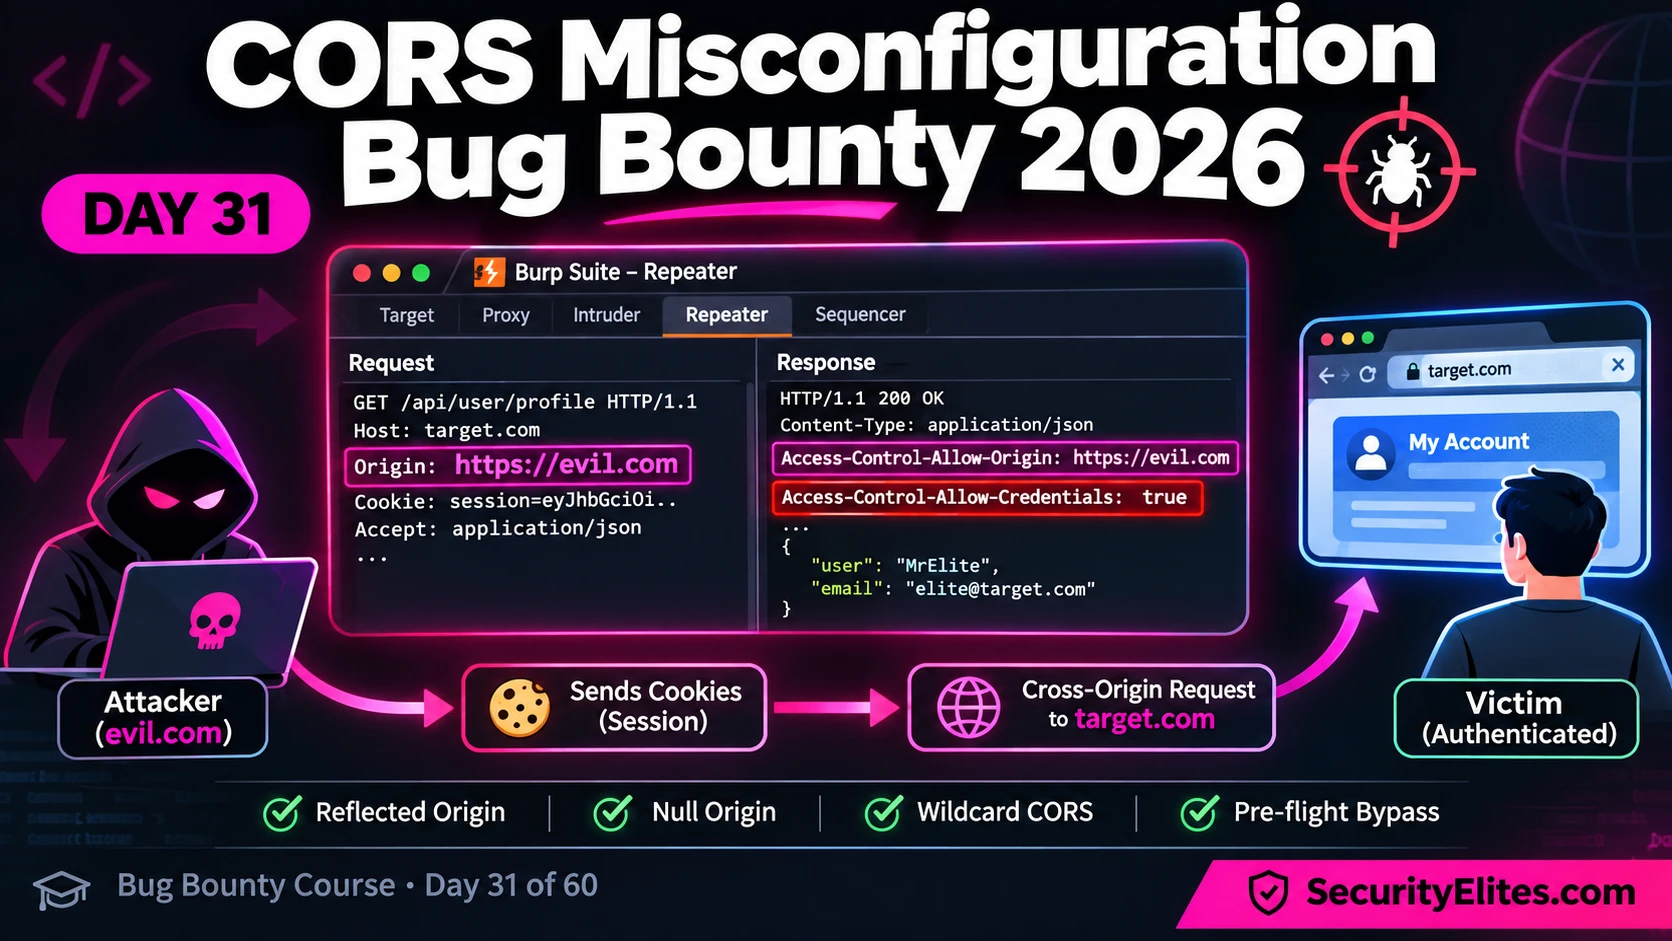
This article is a practical guide for bug bounty hunters on identifying and reporting CORS (Cross-Origin Resource Sharing) misconfigurations. It explains what CORS is, why the browser enforces it, the three main misconfiguration patterns to look for, how to test them in Burp Suite, how to build a JavaScript proof of concept, and how to write a report that justifies the severity claimed. The article matters because CORS bugs are frequently overlooked despite being findable in seconds, yet many hunters misidentify impact or fail to distinguish harmless configuration from exploitable vulnerability.
- CORS as browser permission systemCORS is a permission mechanism that lets servers tell browsers which external websites are trusted to read responses via HTTP headers. The article explains that an origin consists of protocol, domain, and port combined; for example, https://bank.com and https://api.bank.com are different origins even within the same organization. Without CORS and the Same-Origin Policy, a malicious website could exploit JavaScript running on one site to read sensitive data from another site using an authenticated user's session.
- Three CORS misconfiguration patternsThe article identifies reflected origin validation (server blindly echoes the incoming Origin header back), careless domain matching (using substring or suffix checks like endswith() without validating hostname boundaries, allowing evilcompany.com to pass a check for company.com), and null origin trust (developers adding null during testing and forgetting to remove it, enabling sandboxed iframes to send credentialed requests). Each pattern exploits a different developer mistake in origin validation logic.
- Allow-Credentials header determines exploitabilityA reflected origin or null origin by itself is not exploitable; the critical factor is whether the server also returns Access-Control-Allow-Credentials: true. Without this header, the browser refuses to include cookies in cross-origin requests and ignores authenticated responses. Only when both conditions are met—the origin is trusted AND credentials are allowed—can JavaScript on an attacker-controlled page read the victim's authenticated API response. A wildcard Access-Control-Allow-Origin without Allow-Credentials: true is intentionally safe by browser spec.
- Three-step Burp Suite testing methodologyThe article provides a concrete testing workflow: Step 1 tests reflected origin by modifying the Origin header to https://evil.com and checking if the server reflects it back with Allow-Credentials: true; Step 2 tests null origin by sending Origin: null; Step 3 tests subdomain and suffix validation by crafting attacker domains like evilcompany.com or company.com.evil.com. The author emphasizes finding authenticated API endpoints that return user-specific data before testing, using Burp Repeater to modify single headers and inspect responses in seconds.
- JavaScript PoC demonstrates actual browser impactThe article provides a complete JavaScript proof of concept using fetch() with credentials: 'include' to test cross-origin access from a separate origin (e.g., http://localhost:8080). The PoC must be run from an authorized test account and separate domain, and it serves to answer whether the browser actually allows JavaScript to read the authenticated response—Burp Repeater shows server behavior but does not enforce the Same-Origin Policy. The article warns that cookie SameSite settings, third-party cookie restrictions, and authentication mechanisms can all prevent the attack from working even
- Severity driven by data sensitivity not headersThe article introduces a decision tree: reflected origin without Allow-Credentials is Informational/Low; credentials allowed but no sensitive data is Low/context-dependent; credentials allowed with sensitive data exposed (private details, account records) is High; exceptional business/account impact is Critical. The author emphasizes that response headers alone do not determine severity—a technically accurate assessment requires demonstrating what information actually becomes readable and whether that information is meaningful. The article warns against inflating severity simply because the re
- Bug bounty report structure for reproducibilityThe article provides a complete report template including title, severity rating, affected endpoint, summary, reproduction steps, attached evidence (Burp screenshots, response headers, response body showing exposed fields, PoC screenshots), proof of concept description, security impact explanation, and remediation. The author stresses making verification easy for the triager by giving exact endpoint, exact request modification, exact response headers observed, and working PoC. The impact section should be precise about which information becomes readable and under what conditions, not dramatic
- Wildcard origin acceptance has contextThe article clarifies that Access-Control-Allow-Origin: * (wildcard) on an endpoint without Allow-Credentials: true is intentionally safe and often legitimate for public APIs; the browser spec prevents combining * with Allow-Credentials: true by specification. The misconfiguration occurs when a server dynamically reflects a specific untrusted origin AND sets Allow-Credentials: true, which is fundamentally different from a static wildcard policy. The article's Exercise 1 answer key confirms that wildcard alone is not exploitable for credentialed requests because the browser refuses to send cook
Bottom line: A CORS misconfiguration is only reportable when you demonstrate that an untrusted origin can read authenticated sensitive data via browser JavaScript with credentials—Burp response headers are the starting signal, but a working JavaScript PoC on your own test account is required to establish genuine exploitability and justify severity assignment. The difference between an Informational finding and a paid High-severity report is proving impact: show exactly what data an attacker could read, under
FREE
Part of the Bug Bounty 60-Day Course
By the end of this guide, you’ll know how to test reflected origins, identify null origin and unsafe subdomain validation, verify whether credentialed access is actually exploitable, and build a reproducible proof of concept for a bug bounty report. More importantly, you’ll learn how to distinguish a harmless CORS configuration issue from a vulnerability with real security impact. Let’s start with the three-second check I use.
🎯 What you’ll master in Day 31
⏱ ~28 min read · 3 hands-on exercises · Burp Suite + PortSwigger Academy
📋 CORS Misconfiguration – Table of Contents
What CORS is and why the browser cares
Before we start hunting for CORS vulnerabilities, I want you to understand one thing: your browser is constantly protecting you from websites you don’t trust. Imagine you’re logged in to your bank in one browser tab. Now, in another tab, you visit a website created by an attacker. Could that website simply run JavaScript, access your bank account and read your private information? Fortunately, the browser has a security rule designed to prevent exactly that. It’s called the Same-Origin Policy (SOP).
Here’s how I explain it to beginners. JavaScript running on one website cannot freely read responses from another website unless the destination server explicitly allows it. The browser considers an origin to be a combination of three things: protocol, domain and port. For example, https://bank.com and https://api.bank.com are two different origins, even though they belong to the same organisation. This separation is important because without it, a malicious website could potentially make requests using your existing browser session and read sensitive information from other websites.
This is where CORS (Cross-Origin Resource Sharing) comes into the picture. Think of it as a permission system that allows a server to tell the browser which external websites are trusted to read its responses. The server communicates this permission through HTTP response headers. The three headers I always want you to recognise are Access-Control-Allow-Origin, which identifies the permitted origin; Access-Control-Allow-Credentials, which controls whether credentialed requests can be shared with an approved origin; and Access-Control-Allow-Methods, which specifies the permitted HTTP methods.
When everything is configured correctly, CORS allows legitimate applications to communicate across different origins without weakening browser security. But when a developer gets the origin validation wrong, things become interesting for us as bug bounty hunters. A server might accidentally trust an attacker-controlled website and allow its JavaScript to read sensitive responses from an authenticated user’s session. That’s the security boundary we’re looking for. And in the next sections, I’ll show you exactly how to identify these mistakes using Burp Suite.
How the misconfiguration happens
In my experience, the most interesting CORS bugs aren’t caused by developers forgetting what CORS does. They’re usually caused by small mistakes in the code that decides which origins should be trusted. Let me show you three situations I want you to look for when testing an application.
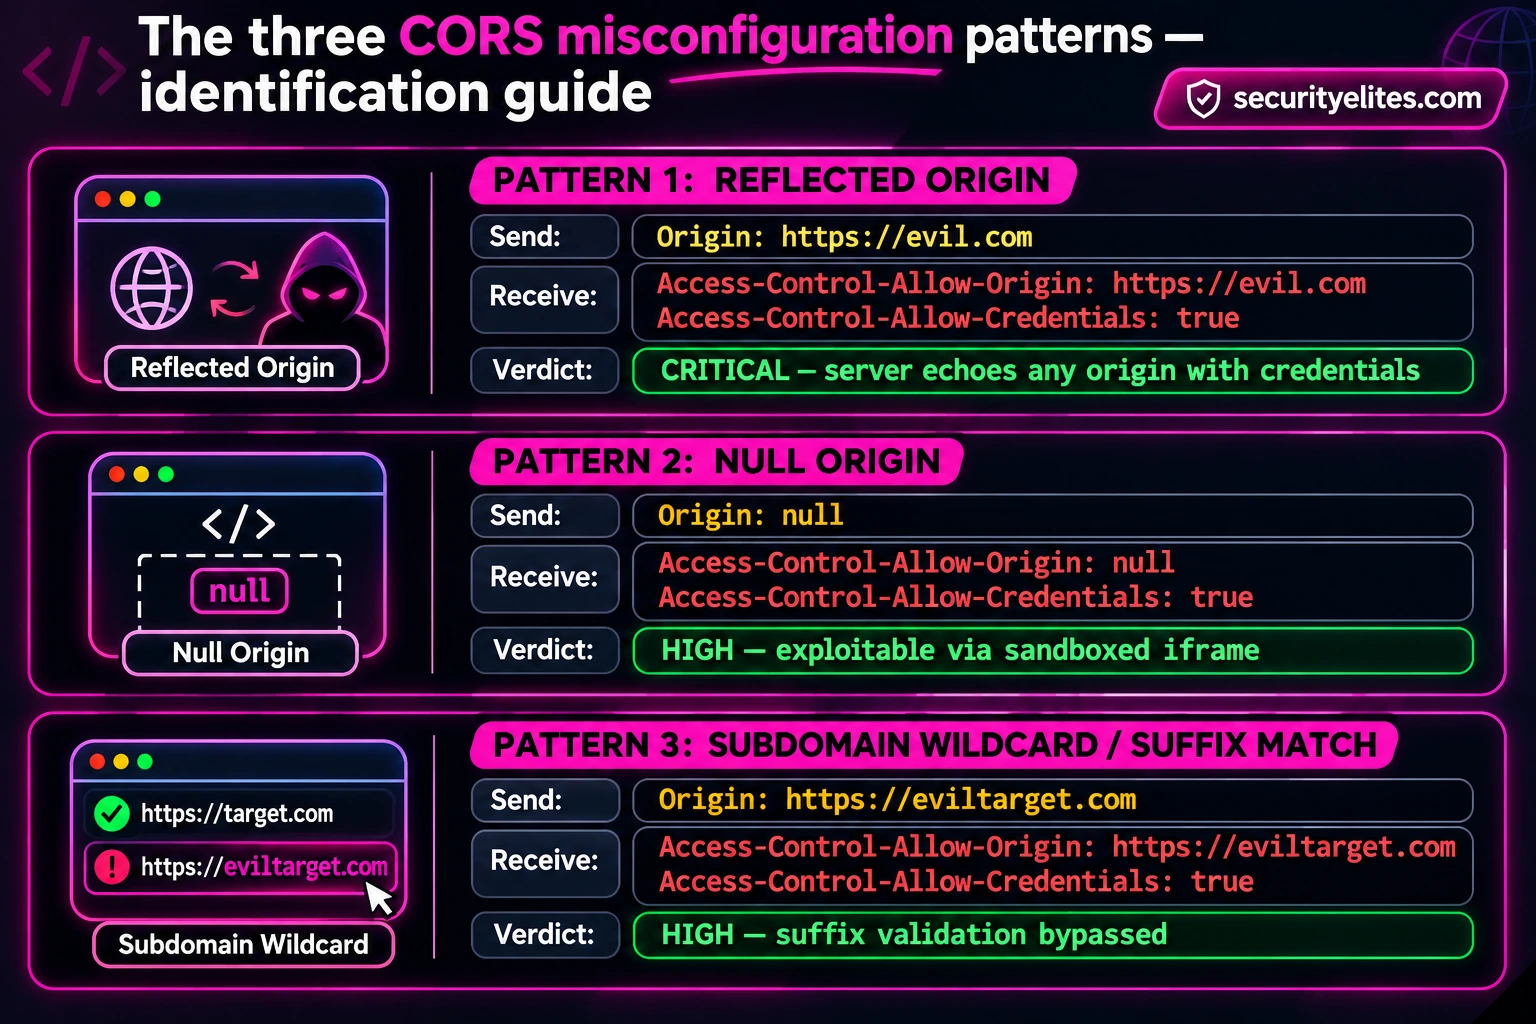
The first mistake is reflected origin validation. A developer wants their frontend at app.company.com to communicate with an API at api.company.com. Instead of maintaining an explicit allowlist of trusted origins, the application reads whatever arrives in the incoming Origin header and sends that same value back in Access-Control-Allow-Origin. If the server blindly reflects https://evil.com, we’ve potentially found something worth investigating. The important question is whether the browser will also allow credentials and whether the response contains sensitive information.
The second mistake is careless domain matching. I’ve seen developers try to solve the allowlist problem with simple string checks. For example, they check whether an origin contains or ends with company.com without properly validating the hostname boundary. An attacker-controlled domain such as evilcompany.com might then pass a poorly written check. Remember, a trusted domain name appearing somewhere inside an attacker-controlled hostname does not make that hostname trustworthy. Always test the complete origin, not just a matching piece of text.
The third mistake is leaving the null origin trusted. Developers sometimes add null to their CORS configuration during local testing or development and forget to remove it before deployment. Browsers can send a null origin in certain contexts, including sandboxed documents with an opaque origin. If a production API trusts that origin and also permits credentialed requests, it deserves a closer look.
Here’s what I want you to take away: don’t report a CORS vulnerability just because you see an unusual response header. Your job is to prove the security impact. Check whether an untrusted origin is accepted, whether credentialed cross-origin access is permitted, and whether an authenticated browser can actually read sensitive response data. That evidence is what turns an interesting observation into a meaningful bug bounty finding.
🧠 EXERCISE 1 — THINK LIKE A HACKER (10 MIN · NO TOOLS)
Spot the vulnerability in each server-side CORS validation snippet before you run anything:
- A server checks:
if request.headers['Origin'].endswith('company.com'): allow. Why is this exploitable, and what origin would you craft to bypass it? - A server returns
Access-Control-Allow-Origin: *on all endpoints. Is this exploitable? Does your answer change if the same endpoint also returnsAccess-Control-Allow-Credentials: true? - A login endpoint returns authenticated data and is configured with a null-origin whitelist for “browser compatibility.” Explain how an attacker can exploit this despite the null origin not being a real website.
company.com — including evilcompany.com, notcompany.com or company.com.evil.com. You’d craft Origin: https://evilcompany.com and the check passes. (2) A wildcard * alone is not exploitable for credentialed requests because the browser refuses to include cookies with a wildcard origin, and it prevents Allow-Credentials: true from being combined with * by spec. If the server tries to return both, the browser ignores the credentials. The wildcard is fine. It’s only when the server dynamically reflects a specific origin AND sets Allow-Credentials: true that it’s exploitable. (3) Sandboxed iframes have a null origin in the browser. An attacker hosts a page with <iframe sandbox="allow-scripts allow-forms" src="..."> inside which JavaScript sends credentialed requests to the target. The iframe’s null origin is whitelisted, so the server allows it with credentials. The attacker reads the response through the iframe’s document context.The three CORS vulnerability patterns I always check
When I’m testing an application for CORS misconfigurations, I don’t approach every suspicious response in the same way. I look for three common patterns: reflected origin, null origin trust, and unsafe subdomain or suffix validation. Each one reveals a different mistake in how the server decides which websites it trusts. Understanding the difference matters because the testing approach, proof of concept and potential security impact can vary significantly.
I want you to remember something before we move into Burp Suite: spotting a suspicious Access-Control-Allow-Origin header is only the beginning. You still need to establish whether an untrusted origin can read an authenticated response and whether that response contains sensitive information. I’ll walk you through each pattern, show you exactly what to look for in the request and response, and explain how to judge the actual impact. By the end, you should be able to recognise these three patterns without confusing a simple configuration mistake with a reportable vulnerability.
Testing CORS in Burp Suite: The Three-Step Check
Now let’s get practical. When I’m testing a web application for CORS vulnerabilities, I don’t start by randomly changing headers across hundreds of requests. I first find an authenticated API endpoint that returns information belonging to the logged-in user. The easiest way to do this is to open your browser’s Developer Tools, switch to the Network tab, browse through authenticated sections of the application and look for API requests returning user-specific data. Once I find a suitable request, I send it to Burp Suite Repeater.
From there, I follow three simple checks. Each one tests a different type of origin validation mistake. You don’t need an elaborate payload at this stage. A carefully modified Origin header and a close look at the response headers will tell you whether the server is behaving suspiciously.
Here’s what I want you to notice: if the server responds with the exact attacker-controlled origin and also returns Access-Control-Allow-Credentials: true, you’ve found a strong lead. But don’t stop here. Check whether the response contains sensitive authenticated information. Repeater lets you inspect the server’s behaviour, but it doesn’t enforce the browser’s Same-Origin Policy. We’ll need a browser-based proof of concept to confirm actual cross-origin access.
The second check is just as simple. I replace the previous origin with null and send the request again. If the server responds by allowing the null origin and credentials, I investigate further. Why? Because browsers can assign a null origin to certain contexts, including sandboxed iframes without the allow-same-origin permission. This can create an opportunity for an attacker-controlled page to read sensitive responses if the remaining browser and application conditions are satisfied.
For the third check, I want you to think about how the developer implemented domain validation. If the target is company.com, I test attacker-controlled domains that contain the trusted name or place it in a misleading position. For example, evilcompany.com and company.com.evil.com help identify different types of poorly implemented substring or suffix checks.
Don’t assume every reflected test origin proves the exact validation flaw. Inspect the server’s behaviour and determine which matching rule is responsible. I also check whether legitimate subdomains are trusted. If a trusted subdomain has an XSS vulnerability, that combination can sometimes provide a route to reading sensitive API responses across origins.
Access-Control-Allow-Origin. This gives me a starting list of endpoints that already implement CORS. I prioritise authenticated API responses and investigate which origins are accepted. A Burp passive scan finding is a useful signal, not proof of exploitability. My final check is always whether an attacker-controlled browser origin can actually read sensitive authenticated response data.One final thing: don’t forget that browser behaviour matters. Cookie SameSite settings, third-party cookie restrictions, the actual authentication mechanism and the browser’s CORS checks can all affect whether an attack works. A convincing bug bounty report should demonstrate the complete chain, not just two interesting response headers.
⚡ EXERCISE 2 — BURP LAB (20 MIN)
Test all three patterns on an authorised lab. Use PortSwigger Web Security Academy’s CORS labs (free account, no sign-up required for labs):
- Go to PortSwigger CORS Lab: Basic Origin Reflection. Proxy through Burp. Find the vulnerable API endpoint and test with
Origin: https://evil.com. Screenshot the reflected origin in the response. - Confirm
Access-Control-Allow-Credentials: trueis present. Note what authenticated data the endpoint returns (account balance, email address, etc.). - Try the null origin on the same endpoint. Does it also reflect null? This tells you whether multiple patterns exist on the same endpoint.
- In your notes: what is the realistic worst-case for an attacker who exploits this? What can they read, and from whose session?
Building the JavaScript PoC — Prove the CORS Vulnerability
So far, we’ve used Burp Suite to identify suspicious CORS behaviour. But here’s the question I always ask before submitting a finding: can I demonstrate that a browser running on an untrusted origin can actually read sensitive information from an authenticated session? That’s where a JavaScript proof of concept (PoC) becomes important.
Think of it this way: a Burp Repeater screenshot shows how the server responds to a modified Origin header. A browser-based PoC takes the investigation one step further by testing whether the browser accepts the CORS response and allows JavaScript to read the returned data. For higher-impact findings, this is particularly valuable because it demonstrates the actual security consequence rather than just an unusual HTTP header.
Let’s build a simple PoC. I’ll use a placeholder API endpoint below. Replace it with an endpoint from your own authorised testing environment that returns data belonging to your test account.
Here’s how I test it. Save the file as cors-test.html and serve it from a separate origin, such as http://localhost:8080, using a local development server. Keep your authorised test account logged in to the target application in the same browser. Then open the PoC page and observe what happens.
The important part of the code is credentials: 'include'. This tells the browser to include eligible credentials, such as cookies, in the cross-origin request. It does not override cookie restrictions. The target application’s cookie attributes, SameSite policy, Secure requirement and browser third-party cookie settings can still prevent cookies from being sent.
If the browser successfully reads the API response, inspect the returned data. Does it contain account information or other sensitive information belonging to your test user? If yes, you’ve demonstrated something much more meaningful than a reflected header: an untrusted origin can read authenticated data under the tested conditions.
If the browser reports a CORS error, don’t immediately conclude that the application is secure. Go back and check the response headers in Burp, confirm that your test account is authenticated, verify the endpoint and inspect the browser’s Network and Console tabs. Cookie restrictions, missing credentials, an incorrect origin, redirects or other response conditions may explain the failure. Repeater evidence and browser evidence answer different questions, and you need to understand both.
My advice is simple: don’t submit a CORS report just because you managed to reproduce two response headers. Show the request, show the response, demonstrate browser-based access using your own test account, and explain exactly what information becomes readable. That’s the difference between reporting a configuration observation and submitting a convincing security vulnerability.
Severity Assessment: When Is a CORS Bug High vs Informational?
This is where I see many beginners make mistakes in bug bounty reports. They discover that a server reflects an external Origin header, spot Access-Control-Allow-Credentials: true in the response and immediately label the finding Critical. But that’s not how severity assessment works. A CORS misconfiguration is only as serious as the security impact you can actually demonstrate.
When I assess a CORS finding, I focus on three questions: Does the server trust an untrusted origin? Can a browser make a credentialed cross-origin request and allow JavaScript to read the response? And most importantly, what sensitive information does that response expose? Your answers determine whether you’re looking at an informational configuration issue or a genuinely high-impact vulnerability.
Let’s look at what these cases mean in practice. If the server reflects an untrusted origin but does not allow credentialed browser access, you generally don’t have an authenticated data-exposure vulnerability. It may still be worth investigating other consequences, but the reflected header alone is not enough to justify a high severity rating.
Now consider a server that allows credentials but the affected endpoint only returns public information. You may have identified a configuration weakness, but what has an attacker actually gained? If there is no meaningful private information to read, the impact is limited. Don’t inflate the severity simply because the response contains Access-Control-Allow-Credentials: true.
The situation changes when an attacker-controlled origin can read sensitive information from an authenticated user’s browser session. Imagine an API returning private account details, personal information or financial records. If you can reproduce that access using your own test account, you’ve demonstrated a genuine confidentiality impact. Depending on the sensitivity and extent of the exposed information, High severity may be justified.
Critical is a different conversation. It should be reserved for cases where the demonstrated impact is exceptionally serious, such as exposure of highly sensitive information at scale or consequences that enable severe account compromise. A CORS header combination by itself does not make a finding Critical.
The same assessment applies to null-origin and subdomain-based CORS issues. Don’t automatically downgrade them because they require a particular browser context, or upgrade them because the response looks alarming. Evaluate the actual exploitability, browser requirements, affected users and exposed data.
One final recommendation: check the bug bounty programme’s own severity policy and use its accepted CVSS or impact-rating methodology. Two programmes can assess the same technical issue differently depending on their assets, user exposure and business risk. Your job is to provide reproducible evidence and a defensible impact assessment, not to chase the highest possible severity label.
Writing a CORS Bug Bounty Report That Gets Paid
Finding a CORS vulnerability is only half the job. The other half is explaining it clearly enough that the triage team can reproduce it, understand the security impact and make a decision without spending hours investigating your submission. I’ve seen technically interesting findings lose momentum simply because the report was vague, missing evidence or exaggerated the impact.
My approach is straightforward: make the report reproducible. Give the triager the exact endpoint, the request header you modified, the response headers you observed and the sensitive information you could read using your authorised test account. If you have a working browser-based PoC, include that evidence too. The goal is to make verification as easy as possible.
Here’s the report structure I recommend. I’ve used fictional domains and placeholder data so you can adapt it to your own authorised findings.
Severity: High — subject to programme policy and demonstrated impact
Affected Endpoint:
GET https://api.target.example/api/v1/account
Summary:
The affected API endpoint accepts an untrusted Origin header and reflects its value in the Access-Control-Allow-Origin response header. It also returns Access-Control-Allow-Credentials: true. Using an authorised test account, I confirmed that JavaScript running on a separate untrusted origin could read the authenticated API response. The response contained private account information, including the account email address and other sensitive account details.
Steps to Reproduce:
1. Log in to the authorised test account on target.example.
2. Open the account section and capture the GET /api/v1/account request using Burp Suite Proxy.
3. Send the captured request to Burp Repeater.
4. Add or modify the following request header:
Origin: https://evil.example
5. Send the request and inspect the response headers.
6. Observe that the server returns:
Access-Control-Allow-Origin: https://evil.example
Access-Control-Allow-Credentials: true
7. Verify that the response body contains private information belonging to the authorised test account.
8. Reproduce the browser-based cross-origin read using the attached PoC and the same test account.
Evidence Attached:
– Burp Repeater screenshot showing the modified Origin header.
– Server response showing the reflected origin and credential permission.
– Redacted response body demonstrating the exposed data fields.
– Browser PoC screenshot confirming successful cross-origin response reading.
Proof of Concept:
A minimal JavaScript PoC was executed from a separate origin against the authorised test account. The browser successfully read the authenticated API response. No third-party user data was accessed or collected.
Security Impact:
An attacker could potentially host a malicious webpage and trick an authenticated user into visiting it. If the user’s browser sends eligible credentials and the vulnerable endpoint exposes private account information, JavaScript on the attacker’s origin may read that information. The demonstrated impact in this report is unauthorised cross-origin access to authenticated account data.
Remediation:
– Maintain an explicit server-side allowlist of trusted origins.
– Compare complete, normalised origin values rather than using substring or unsafe suffix matching.
– Never blindly reflect the incoming Origin header.
– Return Access-Control-Allow-Credentials: true only where credentialed cross-origin access is genuinely required.
– Avoid allowing the null origin unless there is a documented security requirement.
– Validate CORS behaviour across all affected API endpoints and browser contexts.
Now let me explain why I structure reports this way. The title tells the triager what is wrong and what security impact to expect. The summary gives them the complete vulnerability in a few sentences. The reproduction steps remove guesswork. And the evidence demonstrates that the issue is not just a suspicious response header but a browser-accessible security weakness.
Pay particular attention to the impact section. Don’t simply write that an attacker can steal cookies or take over accounts unless you’ve actually demonstrated that consequence. Explain which information becomes readable, under what authentication conditions and what an attacker could realistically do with it. A precise impact statement is much more convincing than dramatic claims.
Finally, keep your screenshots clean. Highlight the modified Origin header in the request, the two relevant CORS response headers and the affected response fields. Redact session cookies, authorisation tokens, personal information and other secrets. Never include another user’s private data in your submission.
Remember, a good bug bounty report doesn’t just tell a programme that something is broken. It proves what is broken, shows how to reproduce it and explains why fixing it matters. That’s how you build credibility with triage teams and submit reports that stand a much better chance of being accepted.
⚡ EXERCISE 3 — WRITE THE REPORT (15 MIN)
Build a complete report from your PortSwigger lab finding:
- Using the PortSwigger CORS lab from Exercise 2 as your target, complete the report template above with the real endpoint URL, the exact response headers you saw, and the real data the endpoint returned.
- Rate the severity using the decision tree above. Does the endpoint return sensitive data? Is Allow-Credentials: true present? What CVSS score do you assign?
- Write a one-paragraph Impact section that explains, in plain English for a non-technical manager, what an attacker who exploited this could actually do to a victim user. No jargon, just consequence.
💰 Quick check: you test an endpoint and get Access-Control-Allow-Origin: * but no Access-Control-Allow-Credentials header. What severity do you assign?
📋 Day 31 reference card
✅ Mark Day 31 complete
You can find, test and report all three CORS misconfiguration patterns — and you know exactly when Allow-Credentials: true turns an Informational into a High.
❓ Frequently asked questions
What is a CORS misconfiguration?
Why is Access-Control-Allow-Credentials: true the key factor?
What is the null origin attack?
Is a wildcard Access-Control-Allow-Origin always a bug?
How do I fix CORS misconfiguration?
Where can I practice CORS testing safely?
📚 Further reading
- Deserialization Bug Bounty — Day 30 — the previous session-theft class; same severity framing, different attack layer.
- OAuth Bug Bounty — Day 18 — CORS and OAuth bugs often chain together; an OAuth endpoint with CORS is a force multiplier.
- Burp Suite Deep Dive — Day 5 — the tool that catches CORS headers and lets you replay them in Repeater.
- External: PortSwigger — CORS Vulnerabilities — the best free CORS learning resource including authorised labs for every pattern.
- External: MDN — Cross-Origin Resource Sharing — the definitive reference for how CORS headers work and the browser’s enforcement rules.