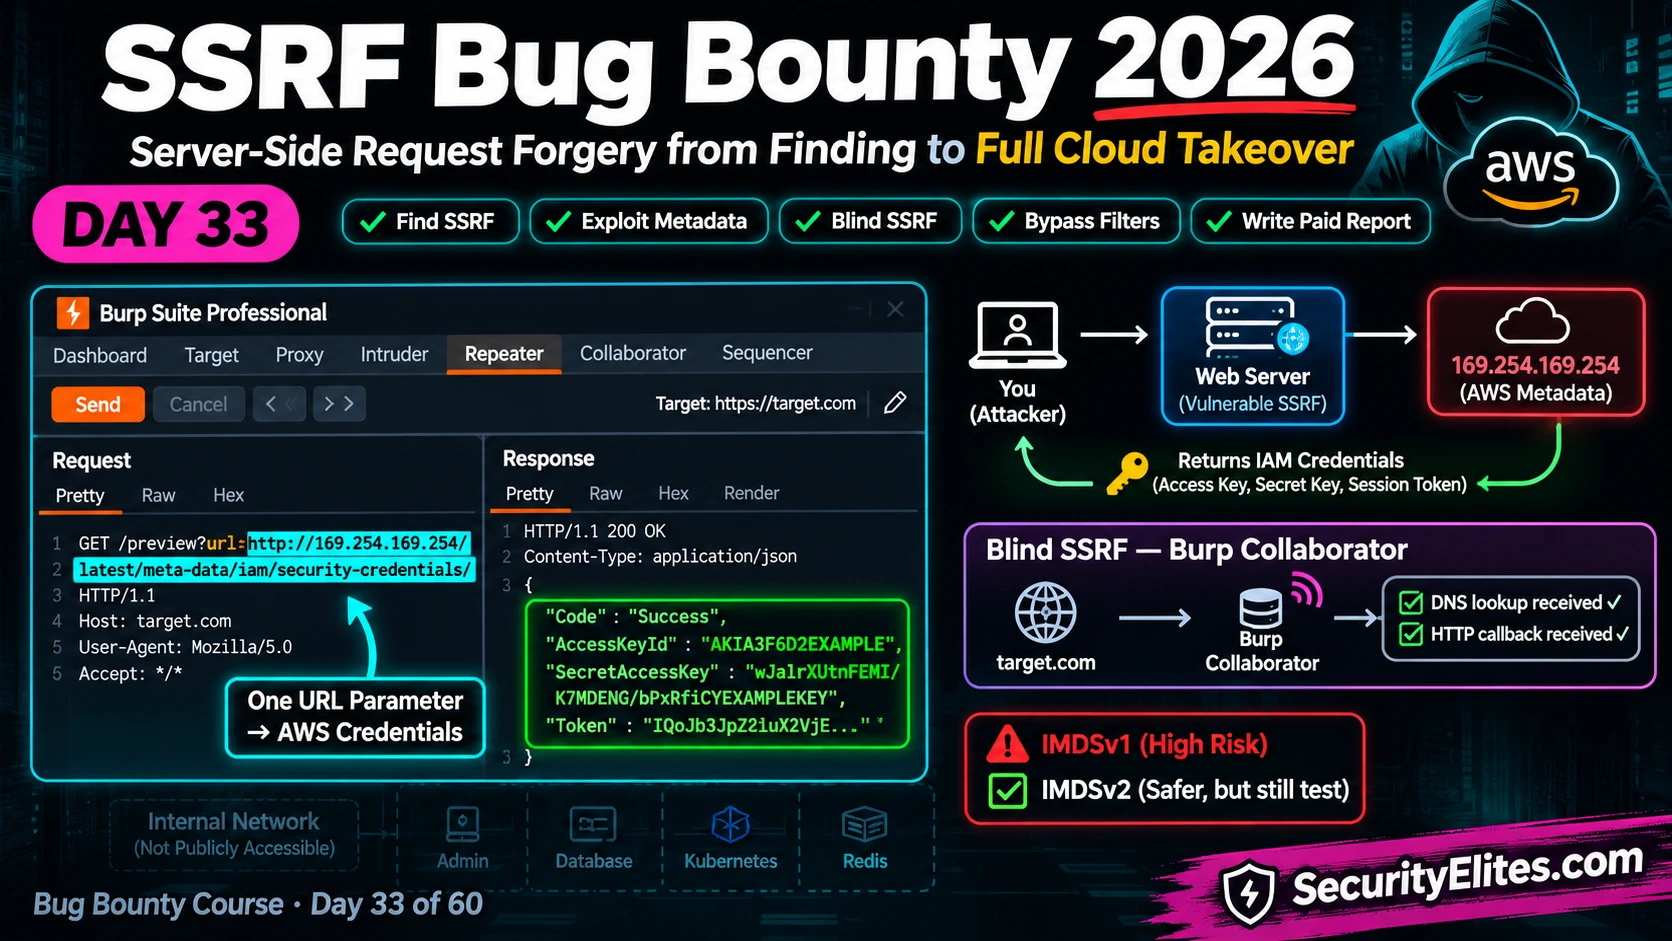
This article is a comprehensive guide to identifying, testing, and reporting Server-Side Request Forgery (SSRF) vulnerabilities in web applications, with a focus on cloud environments. It addresses how attackers can leverage SSRF to access internal resources, cloud metadata endpoints, and sensitive credentials that are unreachable from the public internet. SSRF matters because it can escalate from information disclosure to full cloud account compromise, and systematic testing methodology is essential for both finding these bugs and writing credible reports.
- SSRF fundamentals and server network positionSSRF occurs when an application fetches a remote resource based on unvalidated user input, allowing the server to make requests with its own network privileges. The core vulnerability stems from the server's network position and permissions—it can reach internal services, private APIs, and cloud metadata that the attacker's browser cannot. The article emphasizes assessing each component separately (authentication, firewalls, URL parsing, supported methods) rather than treating one successful request as proof of total internal access.
- Systematic SSRF entry point discoveryThe article identifies SSRF by searching for URL-accepting parameters across HTTP history, with specific focus on parameter names like url=, src=, href=, link=, fetch=, proxy=, and callback=. It extends beyond obvious parameters to include less obvious vectors like PDF generators with img src attributes, SVG uploads, XML imports, webhook configurations, and integration setup fields. Filtering by parameters containing 'url' or 'src' in Burp Suite surfaces approximately 60-70% of SSRF candidates on modern SaaS applications.
- AWS metadata exploitation as critical findingWhen SSRF reaches 169.254.169.254 (the AWS Instance Metadata Service), the exploitation path is straightforward and high-impact. The attack chain involves confirming metadata access at the root, checking for available IAM roles, then fetching credentials from the path /latest/meta-data/iam/security-credentials/[RoleName]. The response contains AccessKeyId, SecretAccessKey, and Token—credentials valid for up to 6 hours that auto-rotate, creating persistent attack surface. The article emphasizes stopping immediately after screenshot documentation and reporting, explicitly forbidding further use
- Blind SSRF detection with out-of-band techniquesBlind SSRF occurs when the server makes internal requests but doesn't return response content. Detection requires out-of-band callbacks using tools like Burp Collaborator, webhook.site, or interactsh—the attacker provides a URL pointing to controlled infrastructure and observes whether the server makes DNS lookups or HTTP requests to it. A DNS callback confirms outbound hostname resolution (Medium severity); an HTTP callback confirms full outbound HTTP capability (Medium-High severity). The article notes that Burp Suite Pro's Collaborator is the standard tool, but Community edition users have
- SSRF filter bypass through alternate IP notationApplications attempting to block SSRF via string matching can be bypassed using alternate representations of the same IP address. Techniques include decimal notation (169.254.169.254 as 2852039166), hexadecimal (0xa9fea9fe), octal notation (0251.0376.0251.0376), URL encoding, IPv6 representation like [::ffff:169.254.169.254], and DNS rebinding using wildcard services like nip.io. The article also mentions redirect chains—if the server follows HTTP redirects, hosting the SSRF payload on attacker-controlled infrastructure and redirecting to the blocked IP can bypass simple blocklists.
- Severity rating based on reachable resourcesThe article establishes a severity framework: blind SSRF with DNS callback only = Medium; blind SSRF with HTTP callback = Medium-High; basic SSRF reading internal service responses = High; SSRF to AWS metadata with instance IDs = High-Critical; SSRF returning IAM credentials = Critical. Severity depends on what the server's identity can access rather than the word 'SSRF' alone. The rating must be supported by specific evidence—the accessible resource type and permissions available to the compromised identity.
- Report structure for credible impact narrativeEffective SSRF reports include numbered steps to reproduce, Burp Repeater screenshots at each key moment, and concrete impact statements describing what an attacker could do with the access gained. For blind SSRF findings, the Collaborator interaction screenshot is core evidence. For metadata findings, the response body showing AccessKeyId is what elevates severity. The article provides a template showing affected endpoint, vulnerable parameter, full reproduction steps, and specific remediation actions like IMDSv2 implementation, URL allowlisting, RFC 1918 blocking, and egress proxy enforcemen
- IMDSv2 as partial but incomplete mitigationIMDSv2 prevents most SSRF exploitation by requiring a PUT request with X-aws-ec2-metadata-token-ttl-seconds header before metadata access is granted. Standard SSRF via GET parameters cannot perform this PUT preflight, making it an effective defense against basic SSRF. However, the article notes this is a mitigation rather than complete fix—some HTTP libraries used for SSRF can make PUT requests, follow redirects, or send arbitrary headers, potentially bypassing IMDSv2 in specific circumstances. It is one layer of defense, not a complete solution.
Bottom line: SSRF is found by systematically identifying URL-accepting features in applications, confirmed through controlled testing against localhost and internal IP ranges, and escalated to critical severity when cloud metadata endpoints are reachable. The key to both finding and reporting SSRF is understanding what the server can reach with its own network privileges—not just proving you can make it make a request, but documenting what sensitive resources or credentials become accessible as a result.
Part of the Bug Bounty 60-Day Course
🎯 What you’ll master in Day 33
⏱ ~32 min read · 3 hands-on exercises · Burp Suite + PortSwigger Academy
📋 SSRF Bug Bounty – Day 33 Table of contents
What SSRF is and how the server becomes your proxy
Server-Side Request Forgery happens when an application fetches a remote resource based on user-supplied input, without properly validating that input. The classic scenario: an application has a “fetch preview” feature that takes a URL and returns the content. You’re supposed to give it your company blog URL to generate a link preview. Instead, you give it http://169.254.169.254/latest/meta-data/. The server faithfully fetches that URL — which is not a blog, it’s the AWS instance metadata service — and returns the directory listing of AWS metadata, right in the preview response. The server made the request with its own IAM identity, and the metadata service responded as if it were the EC2 instance itself.
The core problem is the server’s network position and permissions. It may be able to communicate with internal services that are not exposed to the public internet. SSRF can therefore create a path toward internal admin panels, private APIs, service endpoints, or cloud metadata. But don’t assume that every destination is reachable or that every response is readable. Authentication, egress firewalls, URL parsing, supported HTTP methods, required headers, and response handling all affect what is possible. I assess each of those separately instead of treating one successful request as proof of total internal access.
🧠 EXERCISE 1 — THINK LIKE A HACKER (10 MIN · NO TOOLS)
Map the SSRF attack surface for a hypothetical SaaS application before touching Burp:
- A project management tool lets users “import tasks from Jira” by entering a Jira server URL. What parameter in the import request likely contains the URL? What internal resources could you target by changing it?
- A marketing platform lets users set a webhook URL to receive notifications. The platform validates that the webhook URL returns a 200 response before saving it. What can you do with this validation request to detect SSRF? What if the webhook URL itself isn’t returned to you, but you can observe whether the save succeeds?
- An e-commerce site generates PDF invoices. The invoice generation request includes the page URL:
pdf_url=https://store.example.com/invoice/12345. You change it topdf_url=http://localhost:8080/admin. What would appear in the generated PDF if the server is running an internal admin panel on port 8080? - The app is confirmed to be running on AWS. You’ve found SSRF on a URL parameter. The request returns the full response body. What is the first URL you’d test, and what are you hoping to see in the response?
Finding SSRF entry points
The first step is systematic — search every parameter in Burp’s HTTP history for anything that looks like it accepts a URL. That means strings starting with http, ftp, or file paths, but also parameter names that suggest URL-fetching behavior. I search for the parameter names themselves as much as the values.
Testing basic SSRF — internal IPs and localhost
Once you have a candidate parameter, start with the most obvious targets: localhost and the RFC 1918 private ranges. The goal is to confirm that the server is making the request with your input as the URL — not just generating a client-side link. The clearest evidence is a response that contains the content of the internal resource. If you get a port banner, an admin panel, or even a connection refused error that’s specific to a known port, that’s confirmation the server is trying to connect.
Cloud metadata exploitation — the AWS path
When a basic test returns content from 169.254.169.254, you have a Critical finding in progress. The enumeration path is well-documented and fast. The metadata directory listing tells you what’s available, and the IAM credentials path is always the same. This is exactly the kind of finding that requires you to stop once you’ve confirmed the credential exposure, document everything, and report immediately — don’t use the credentials to prove further access on live infrastructure.
aws sts get-caller-identity call — is active exploitation beyond the scope of most programmes and potentially illegal. Some programmes explicitly state you must report IAM credential access immediately without further use. When in doubt, the answer is always: screenshot and report.Blind SSRF — out-of-band detection
Most SSRF in the real world is blind — the server makes the internal request but doesn’t return the response content to you. The page shows a success message, an error message, or nothing at all. Detecting blind SSRF requires out-of-band techniques: you give the server a URL that points to something you control, then check whether that thing receives a request. The standard tool for this is Burp Collaborator in Burp Suite Pro. Collaborator gives you a unique subdomain; any DNS lookup or HTTP request to that subdomain is logged in real-time, even if the HTTP response from the application tells you nothing.
Blind SSRF with only a DNS callback is typically rated Medium — you’ve confirmed the server resolves external hostnames on your input, but you can’t directly read internal resources or prove what else is reachable. Blind SSRF with an HTTP callback is higher because you’ve confirmed a full outbound HTTP request, which means the server is likely capable of reaching internal services — you just can’t see the responses. The impact narrative for blind SSRF should focus on what the server could reach (internal admin panels, metadata endpoints, Redis, Elasticsearch) even if you haven’t confirmed specific access, and explain why the blind nature doesn’t eliminate the risk.
⚡ EXERCISE 2 — BURP LAB (25 MIN)
Use PortSwigger Web Security Academy’s SSRF labs to test both basic and blind SSRF:
- Open the PortSwigger SSRF Lab: Basic SSRF against localhost. Find the vulnerable parameter (hint: it’s in the product stock check request). Change the URL to
http://localhost/adminand observe the admin panel returned in the response. - Use the lab admin panel to delete the target user. Screenshot the full Burp Repeater exchange — the modified request and the admin panel response — as your PoC.
- Try the SSRF against a backend system lab. Enumerate the internal IP range to find the admin service — the lab shows how to use Burp Intruder to scan
192.168.0.1through192.168.0.254for a port with a 200 response.
Filter bypass techniques
Some applications try to prevent SSRF with a blocklist that rejects strings such as localhost or a familiar private IP address. That is fragile because hostnames can resolve to private addresses, IPs have alternate textual representations, and an otherwise permitted public URL may redirect to a prohibited destination. In an authorized lab, bypass testing helps demonstrate why string matching is not a complete defence. On a live programme, test only within the stated scope and do not repeatedly probe sensitive infrastructure.
Severity: from Medium to Critical
I do not assign severity from the word “SSRF” alone. I assess what the vulnerable feature lets an attacker make the server do, what data is exposed, whether authentication is required, whether the behaviour is reproducible, and what the server’s identity can access. A DNS callback, a readable internal response, and exposed cloud credentials represent very different impact levels. Use the programme’s severity rubric and support the rating with evidence rather than assumptions.
Writing the report that pays
SSRF reports win at triage when the evidence is specific and the impact narrative is concrete. For a blind SSRF finding, your Collaborator screenshot is the core evidence. For a metadata SSRF finding, the response body showing AccessKeyId is what turns “High” into “Critical”. Write the attack chain as numbered steps, include the screenshot at every key moment, and state the impact in terms of what an attacker could do with the access gained — not just “cloud credentials exposed.”
Severity: Critical (CVSS 9.8) — full IAM credential exposure
Affected Endpoint: POST https://app.target.com/api/fetch-preview
Parameter: url (application/json body)
Summary: The url parameter in the fetch-preview API endpoint is passed directly to a server-side HTTP client without URL validation. By setting the value to http://169.254.169.254/latest/meta-data/iam/security-credentials/EC2InstanceRole, the server returns the AWS IAM temporary credentials attached to the EC2 instance running the application, including AccessKeyId, SecretAccessKey, and SessionToken.
Steps to Reproduce:
1. Log in to app.target.com and navigate to the link preview feature
2. Intercept the POST request to /api/fetch-preview in Burp
3. Modify the request body to: {“url”: “http://169.254.169.254/latest/meta-data/”}
4. Observe the response includes the metadata directory listing
5. Send: {“url”: “http://169.254.169.254/latest/meta-data/iam/security-credentials/”}
6. Response includes the IAM role name: EC2InstanceRole
7. Send: {“url”: “http://169.254.169.254/latest/meta-data/iam/security-credentials/EC2InstanceRole”}
8. Response contains AccessKeyId, SecretAccessKey, and Token [screenshot attached]
Impact: An attacker with these credentials can make authenticated AWS API calls as the EC2 role, potentially accessing S3 buckets, RDS databases, Secrets Manager, and other AWS services within the role’s permissions. Even a minimal IAM role can be leveraged for further enumeration. These credentials are valid for up to 6 hours and auto-rotate, so the attack surface is persistent while the SSRF is unpatched.
Remediation: (1) Implement IMDSv2 on all EC2 instances, which prevents GET-based metadata access. (2) Validate the URL parameter against an allowlist of expected domains before making server-side requests. (3) Block all requests to RFC 1918 addresses (10.0.0.0/8, 172.16.0.0/12, 192.168.0.0/16) and the link-local range (169.254.0.0/16). (4) Make server-side HTTP requests through an egress proxy that enforces the allowlist.
⚡ EXERCISE 3 — WRITE THE REPORT (15 MIN)
Convert your PortSwigger lab findings into a full report:
- Write the full steps to reproduce for the localhost admin panel lab. Use the actual endpoint URL and parameter you modified. Attach your Burp Repeater screenshot.
- Rate the CVSS score for SSRF to localhost admin panel vs SSRF to AWS metadata endpoint. For each: set Attack Vector, Privileges Required, Confidentiality Impact, and Integrity Impact. How do the two scores differ, and why?
- Write one paragraph explaining why blind SSRF without proven internal access is still worth reporting. What’s the realistic worst case? Why should a programme fix it even if you haven’t proven you can read internal content?
💰 Quick check: you send url=http://169.254.169.254/latest/meta-data/ and get a 403 response back from the application. The normal response is 200 with a preview. What is the most accurate conclusion?
📋 Day 33 reference card
✅ Mark Day 33 complete
You can find SSRF entry points, test against cloud metadata, detect blind SSRF with Collaborator, bypass IP encoding filters, and correctly rate the severity from Medium to Critical based on what’s reachable.
❓ Frequently asked questions
What is SSRF?
Why is 169.254.169.254 so important for SSRF?
What is blind SSRF and how do I detect it?
What SSRF bypass techniques work against IP blocklists?
How is SSRF severity rated?
Does IMDSv2 prevent SSRF exploitation?
📚 Further reading
- OAuth Token Leakage Bug Bounty — Day 32 — OAuth flows running on AWS-hosted apps add an SSRF escalation path: leaked tokens + reachable metadata = double finding.
- Burp Suite Deep Dive — Day 5 — Burp Collaborator is the essential tool for detecting blind SSRF; this session covers all Burp tools including Collaborator setup.
- External: PortSwigger — SSRF Vulnerabilities — the most complete free SSRF lab series, covering basic SSRF, blind SSRF, and filter bypass techniques.
- External: AWS — IMDSv2 Configuration Guide — the definitive reference for why IMDSv2 matters and how to enforce it across your EC2 fleet.