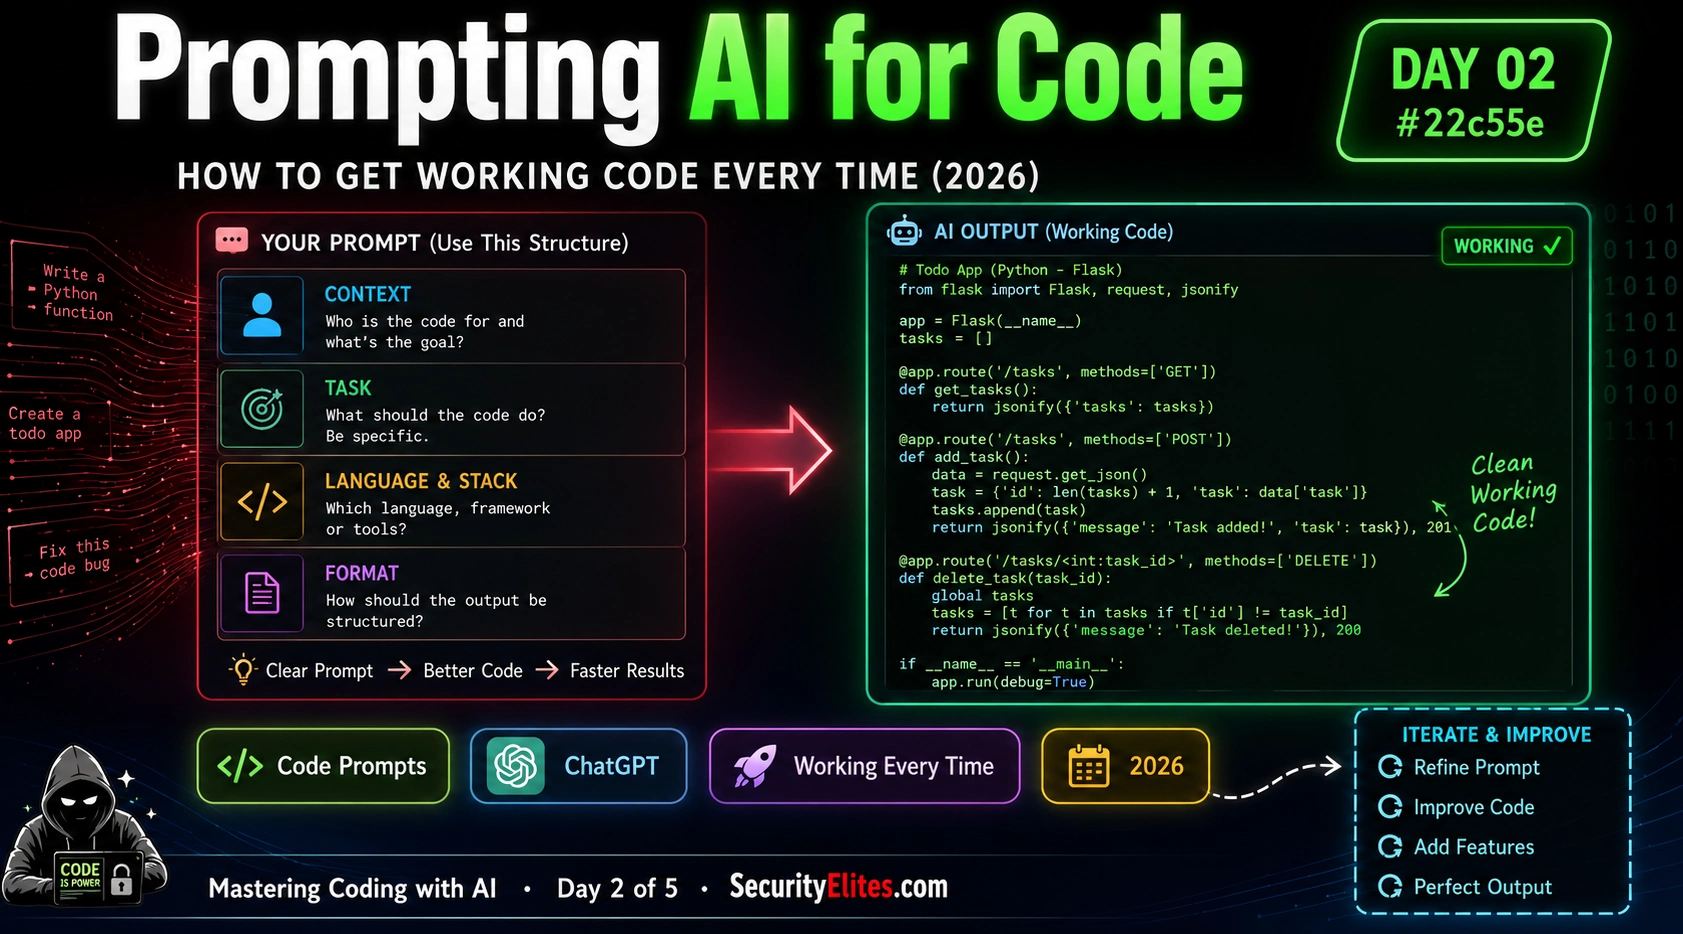
This educational article teaches a structured five-component prompting methodology for reliably generating working code from AI assistants. It addresses the common frustration that AI-generated code often fails or requires multiple rounds of debugging, arguing that the real problem is weak prompt structure rather than AI limitations. The article provides a complete framework—Context, Task, Language, Format, and Constraints—that developers can apply to get functional, deployable code on the first attempt, along with hands-on exercises and real prompt examples demonstrating the difference between weak and strong specifications.
- Five-component prompt structure guarantees reliabilityEvery code prompt must contain Context (who uses this, where it runs), Task (describe behavior not implementation), Language (programming language and version), Format (how to deliver the code), and Constraints (what the code must not do). Each component answers a question a professional developer would ask before coding. The article demonstrates this with a complete password strength checker example where all five components produce working code in one pass, contrasting with generic prompts that force the AI to make average assumptions.
- Describe behavior and outcomes, not code mechanicsThe Task component must specify what the tool does using the Input → Process → Output model from Day 1, not technical implementation details. For example, 'When the user clicks Submit, check whether all required fields are filled in and show a red message if any are empty' works better than 'I want a button that runs a function.' The article emphasizes that behavioral specifications let the AI translate behavior to code, whereas asking for code features presumes the writer already knows how to code.
- Context fundamentally changes what code gets generatedThe article identifies Context as the component with the most dramatic impact on output. Specifying 'non-technical employees will use it in a browser with no installation' produces different code than 'developers on the team,' affecting error message wording, edge case handling, and interface complexity. The three main environment types—browser (HTML/CSS/JavaScript), computer (installed programs), and server (remote deployment)—are the most technically consequential part of context and directly determine language and architecture choices.
- Constraints embed security and prevent dangerous AI assumptionsThis component addresses data privacy ('Do not send user input to any external server'), input handling ('Handle empty input gracefully'), scope ('Only do exactly what specified'), and dependency safety ('No external libraries' or restrict to established ones with 1M+ downloads). The article stresses that constraints cost nothing to write and protect against real threats; it references the 'AI code assistant backdoor injection' problem where developers compromised production systems by allowing malicious dependencies the AI pulled in without explicit constraints.
- Format instructions make code immediately usableWithout format specification, the AI often returns code wrapped in explanations, split across sections, or with unfilled placeholders. The article recommends requesting 'a single complete file I can save and run,' 'complete file with comments explaining each section,' and critically, 'give me a numbered list of what I need to do to run it.' This last instruction prevents hours of beginner confusion by having the AI explicitly state dependencies, installation commands, and execution order.
- Iterative prompting evolves code without restartingThe article provides an iterative formula: acknowledge what works, specify exactly what to change and the desired behavior, request the complete updated file (not a diff). A detailed example shows a password checker evolving through four iterations—adding color-coded tips, a copy-to-clipboard button, and mobile responsiveness—each taking one or two sentences and building on the previous version's working foundation. Requesting the complete file prevents error-prone line-by-line merging when developers don't know how to read code.
- Weak prompts lack specificity and create exploitable gapsThe article contrasts weak vs. strong prompts across three real examples: 'Write code to check if an email is valid' (weak) versus a full five-component specification including input, real-time validation, output format, and constraints (strong). A particularly risky weak prompt is 'Make a login page with username and password' without constraints on password hashing, rate limiting, or session management—the article identifies this as security-critical and notes Exercise 2 requires auditing such prompts for missing constraints that could cause real harm.
- Edge cases must be specified to prevent security vulnerabilitiesWithin the Task component, the article requires an explicit Edge Cases section asking: 'What if the input is empty? Invalid? Unexpectedly long?' Covering these in the prompt description means the AI bakes correct handling into the initial code rather than leaving exploitable gaps. The article argues this prevents a class of security vulnerabilities where malformed or malicious input breaks or exploits the tool without proper specification.
Bottom line: Master the five-component prompting structure—Context, Task, Language, Format, and Constraints—and you will consistently produce working, deployable code from AI on the first attempt; weak prompts fail not because AI is incapable but because developers haven't specified what they actually want with sufficient precision and security awareness. The difference between frustration and success is structured prompting discipline, not the AI itself.
I’ve watched the same scene play out dozens of times: someone opens ChatGPT, types “write me a Python script that does X,” gets code back, runs it, and it doesn’t quite work. They ask for a fix. They get more code. Still not right. After three rounds they’re frustrated and convinced AI coding “doesn’t work for non-developers.”
The real problem is almost never the AI. It’s the prompt. A weak prompt gets you a plausible first guess at what you might have wanted. A strong prompt gets you working code that does exactly what you specified. The difference between those two outcomes is a structured prompting approach — and once I teach it to people, their AI coding success rate goes from frustrating to consistent within a single session.
Today I’m giving you the complete prompting stack I use every time I generate code with AI: Context, Task, Language, Format, and Constraints. Five components. Every time. No exceptions. By the end of today you’ll have produced working code from your own prompt — something that actually runs and does something real.
🎯 What You’ll Master in Day 2
⏱ 25 min read · 3 exercises · Browser only for exercises
- Completed Day 1: How to Think About Code
- Comfortable with: Input → Process → Output model, architect vs builder role, specificity levels
- Have access to any AI chatbot (ChatGPT, Claude, Gemini — all free tiers work)
Prompting AI for Code — Day 2 of 5
- The Five-Component Code Prompt Stack
- Context — Tell AI What World This Code Lives In
- Task — Describe What to BUILD, Not What to TYPE
- Language and Format — Make Outputs Immediately Usable
- Constraints — The Component Most People Skip
- Iterative Prompting — How to Evolve Code Without Starting Over
- Weak vs Strong Prompts — Real Examples
- Questions and Answers
Day 1 gave you the mental model. Today you put it into practice. The prompting skills here connect directly to the Prompt Engineering course Day 2 on general prompt structure — but today is specifically tuned for code generation, where the stakes are higher because the output either runs or it doesn’t. And our Google Dork Generator is a good example of a tool built exactly this way — straightforward IPO logic, clearly specified, deployed as a browser tool. You’ll be building something similar by Day 4.
The Five-Component Code Prompt Stack
Every strong code prompt I write has five components. Not all five need equal length, and for simple tasks some can be one sentence. But all five should be present, because each one does work that the others can’t.
The five components are: Context, Task, Language, Format, and Constraints.
Think of them as the five answers to the five questions a good developer would ask before writing any code: What world does this live in? What should it do? In what language? In what form do you need the output? What must it not do?
Before I show them individually, here’s what a full five-component prompt looks like for a simple tool:
TASK: Build a password strength checker. Input: a text box where the user types a password. Process: check if the password has 12+ characters, at least one uppercase letter, at least one number, and at least one special character. Score it: Weak (0-1 criteria), Fair (2-3 criteria), Strong (all 4 criteria). Output: a colour-coded strength label (red/amber/green) that updates in real time as the user types. Do NOT show the password strength to anyone else — this runs only in the user’s browser.
LANGUAGE: A single HTML file with embedded CSS and JavaScript. No external libraries or downloads.
FORMAT: Give me the complete HTML file I can save and open directly in Chrome. Include comments in the code explaining what each section does.
CONSTRAINTS: Never send the password anywhere. All processing must happen in the browser only. No network requests. Keep the design dark and professional.
That prompt gets working, deployable code in one pass. Let me take each component apart.
Context — Tell AI What World This Code Lives In
Context is the component that most dramatically changes what the AI builds. It answers: who uses this, where does it run, what level of technical sophistication can I assume from the user, and what is the broader purpose of this tool?
Without context, the AI makes assumptions — usually the most generic, average assumptions it can. Generic is almost never what you want. Context forces the AI to make the right assumptions rather than the average ones.
Good context answers three sub-questions:
Who uses it? “Non-technical employees” produces different code than “developers on the team” or “customers who may be on slow mobile connections.” The user’s technical level affects how error messages are worded, how much explanation is included in the interface, and what edge cases get handled gracefully vs what gets left for users to deal with.
Where does it run? The environment question is the most technically consequential part of context. Three main environments to know:
→ Browser: code runs in Chrome/Safari/Firefox with no installation. Use HTML/CSS/JavaScript. The user never runs a program — they open a file or visit a URL. This is where most beginners should start.
→ Computer: code runs as a program on someone’s machine. Needs to be installed or at least Python to be present. More powerful but more setup friction.
→ Server: code runs on a remote machine that other people connect to over the internet. Most complex. For later in the course.
What’s the broader purpose? “For a security awareness training programme” tells the AI this needs to be professional, accurate, and probably shouldn’t display anything that looks like actual attack tools. “For my personal use” tells it to optimise for function over appearance.
Task — Describe What to BUILD, Not What to TYPE
The task component is where your Input → Process → Output model from Day 1 goes directly to work. Describe the tool behaviourally — what it does — not technically — how it should be coded.
The biggest beginner mistake in the task description: talking about buttons and code instead of behaviour and outcomes. “I want a button that runs a function” is talking about code. “When the user clicks Submit, check whether all required fields are filled in and show a red message if any are empty” is talking about behaviour. The AI can translate behaviour to code. You can’t translate code requirements into behaviour without already knowing how to code.
My task template, derived from the Input → Process → Output model:
Process: What happens to that input — in behavioural terms
Output: What the user sees, receives, or what changes in the world
Edge cases: What should happen if input is missing, invalid, or unexpected
The edge cases line is critical for security. “What if the input is empty?” “What if someone enters a number where text is expected?” “What if someone types something very long?” These are the questions that expose vulnerabilities in vaguely specified code — and covering them in your task description means the AI bakes the correct handling in from the start rather than leaving them as exploitable gaps.
Language and Format — Make Outputs Immediately Usable
Language and Format are the practical components — they determine whether you can actually use what the AI gives you.
Language: Specify the programming language and any relevant version or constraints. My rules of thumb for beginners:
→ Want something that runs in a browser? → HTML/CSS/JavaScript, single file
→ Want to process data on your computer? → Python
→ Want to run something on a server? → Python with Flask or Node.js (ask AI to recommend)
→ Unsure? → Ask the AI: “Given my context and task, what language and setup do you recommend and why?”
Format specifies how the AI delivers the code. This is underrated. Without a format instruction, AI often gives you code wrapped in explanations, split across multiple sections, or with placeholders you need to fill in manually. Be explicit:
→ “Give me a single complete file I can save and run”
→ “Include comments in the code explaining each section”
→ “Give me the complete file, not just the changed sections”
→ “After the code, give me a numbered list of what I need to do to run it”
That last format instruction — “after the code, give me a numbered list of what I need to do to run it” — has saved beginners hours of confusion. The AI knows what dependencies need to be installed, what commands to run, and in what order. Make it tell you.
You’re going to write your first complete five-component prompt and get real working code. Not a tutorial you copy — your own prompt, your own tool, running in your browser. I’ll give you a template and a suggested project, but the specification you write is yours. This is the most important exercise in the course because it converts the mental model into actual capability.
- Choose your tool. Pick one that genuinely interests you from this list, or invent your own:
- A password strength checker (tests whether a password meets security criteria)
- A word counter that also shows reading time
- A simple BMI calculator with a health category label
- A random colour picker that shows the hex code
- A text case converter (convert text to uppercase / lowercase / title case)
- Write your five-component prompt. One paragraph per component. Use the structure from this day’s content. Don’t skip Constraints.
- Open any AI (ChatGPT, Claude, Gemini). Paste your prompt. Get the code.
- Save the code as a .html file on your computer (copy the code → open Notepad / TextEdit → paste → save as “mytool.html”).
- Open that file in Chrome or any browser. Does it work? Test it with several different inputs including edge cases (empty input, very long input, unexpected characters).
- Write down one thing it does perfectly and one thing you’d want to improve.
Constraints — The Component Most People Skip
Constraints are where security lives in your code prompt. They’re also where you avoid common AI coding pitfalls that produce tools that work incorrectly rather than tools that don’t work at all — the subtler and more dangerous failure mode.
I never skip constraints. Every tool I build has them, even simple ones. My standard constraints checklist:
Data privacy constraints. “Do not send user input to any external server.” “All processing must happen in the user’s browser only.” “Do not store any user data.” These prevent the AI from casually generating code that sends your users’ data somewhere without your knowing — a real risk with AI-generated tools that interact with external APIs.
Input handling constraints. “Handle empty input gracefully — show a clear message, don’t crash.” “Sanitise all input before using it.” “Limit input length to [X] characters.” These prevent a class of security vulnerabilities where malformed or malicious input breaks or exploits your tool.
Scope constraints. “Only do exactly what’s specified — don’t add features I didn’t ask for.” This sounds strange but is genuinely useful. AI sometimes adds “helpful” features — caching, logging, external API calls — that you didn’t ask for and might not want. Constraining scope keeps the code simple and auditable.
Dependency constraints. “No external libraries — only standard language features.” “If you need a library, use only established ones with 1M+ downloads.” Dependencies are a major attack vector in software — malicious packages have been published to common package registries specifically to get included in AI-generated code. Constraining dependencies reduces that risk significantly.
The AI code assistant backdoor injection article covers exactly what happens when these constraints aren’t specified. I’ve seen production systems compromised through AI-generated code that pulled in a malicious dependency the developer didn’t notice. Constraints in your prompt cost nothing and protect against real threats.
Iterative Prompting — How to Evolve Code Without Starting Over
Working code is rarely the final destination. You get something that works, and then you want to add a feature, change the appearance, improve an edge case, or fix something that behaves unexpectedly. This is where most beginners go wrong: they start a fresh conversation instead of continuing the existing one.
Continuing the existing conversation is almost always better because the AI has the full context of what it already built. It can make targeted changes without accidentally breaking the things that already work. Starting fresh means re-specifying everything and hoping the second version preserves what worked about the first.
My iterative prompting formula:
// Acknowledge what works — prevents AI from changing it
“The [specific component] needs to change: [current behaviour] → [desired behaviour].”
// Be precise about what’s wrong and what correct looks like
“Please update the code. Give me the complete updated file, not just the changed section.”
// Always ask for the complete file — avoids “merge this change yourself” ambiguity
The “give me the complete updated file” instruction is the one I use every single time without exception. Some AI assistants will give you a diff (only the changed lines) and say “replace lines 47-52 with this.” If you don’t know how to read code, finding lines 47-52 and making that replacement is error-prone. Asking for the complete file means you save the whole thing and replace the previous version. Clean, simple, no surgical editing required.
Weak vs Strong Prompts — Real Examples
I want to make the difference between weak and strong prompts completely concrete before Day 2 ends. Here are three real prompt pairs — the kind of thing I see beginners write vs the revised version that gets working code.
Example 1 — Email Validator:
Weak: “Write code to check if an email is valid.”
Strong: “Context: a browser tool for a contact form. Task: Input is a text field where the user types an email. Process: Check in real time as they type whether the email matches the format [local]@[domain].[extension]. Output: green checkmark if valid, red X if invalid, shown next to the input field. Language: single HTML file. Format: complete file with comments. Constraints: no external APIs, no data sent anywhere, handle empty input gracefully.”
Example 2 — Data Table:
Weak: “Show my data in a nice table.”
Strong: “Context: I have a CSV file with columns: Name, Score, Date. I’ll paste the CSV data into the code. Task: Display the data in a clean sortable table — clicking a column header sorts by that column ascending, clicking again sorts descending. Output: sorted table updating immediately without page reload. Language: single HTML file with embedded JavaScript. Format: complete file, comments on the sorting logic. Constraints: no external libraries, data stays on client.”
Example 3 — URL Checker:
Weak: “Check if a URL is safe.”
Strong: “Context: personal security tool running in my browser. Task: Input is a text field where I paste a URL. Process: Check if the URL matches any of these patterns that indicate phishing — mismatched domain (PayPal.com.evil.com), excessive hyphens (pay-pal-login-secure.com), IP address instead of domain name. Output: flagged URL patterns highlighted in red with a label explaining the suspicious pattern. Also show a green ‘no obvious issues found’ if no patterns match. Language: single HTML file. Format: complete file. Constraints: no external requests, all pattern matching in browser only, make clear this is a basic check not a definitive security verdict.”
The pattern is consistent: the strong version answers all five components, specifies behaviour not implementation, covers edge cases and constraints, and asks for a usable format. None of it requires technical knowledge. All of it requires the Input → Process → Output thinking from Day 1.
The best way to sharpen your prompting skills is to read other people’s weak prompts and identify exactly where they’ll fail. This is also security thinking: identifying gaps before they become problems. I want you to audit three prompts and find what’s missing from each one — then rewrite one of them properly.
- Read each of these real prompts people have used for AI coding. For each one, identify: which of the five components are missing? What will the AI assume incorrectly? What security problem could result?
- Prompt A: “Build me a contact form that sends emails to my address.”
- Prompt B: “Create a script that reads a CSV file and shows the data in a chart.”
- Prompt C: “Make a login page with username and password.”
- For Prompt C, write the full five-component version. This is the most security-critical — what constraints absolutely must appear for this to be safe?
- Identify the single most dangerous missing constraint across all three prompts — the one that, if left missing, could cause real harm to real users.
Iterative prompting is the skill that separates people who can build polished tools from people who can build basic ones. I want you to start with your Exercise 1 tool and evolve it through five improvements using the iterative formula. Each iteration should be small, precise, and acknowledge what already works. By the end you’ll have something meaningfully better than where you started.
- Open the AI conversation where you built your Exercise 1 tool (or start a new one and rebuild it with your prompt).
- Identify five improvements you’d want:
- Something visual (appearance improvement)
- Something functional (a new feature)
- Something protective (a better error message or edge case handler)
- Something for mobile (ensure it works on a phone)
- Something for sharing (add a title, a brief description, a footer)
- Execute all five as iterative prompts using the formula: “The [X] works. The [Y] should change from [current] to [desired]. Give me the complete updated file.”
- After each iteration: save the new version, open it in your browser, confirm the change worked, then proceed to the next.
- Compare your Day 1 first version vs your final version. How much better is it?
Questions and Answers
Which AI is best for code generation — ChatGPT, Claude, or something else?
All three majors (ChatGPT with GPT-4o, Claude 3.5 Sonnet, Google Gemini 1.5 Pro) produce excellent code. The practical differences: ChatGPT handles very long code well in the paid tier. Claude tends to write more readable code with better comments — I find it best for beginners because the explanations are clearer. Gemini integrates well if you’re working in Google’s ecosystem. For code-specific work, Cursor and GitHub Copilot are purpose-built coding assistants that understand code context more deeply than chat AI — highly recommended for when you get past the basics. For this course, any free tier is sufficient.
What do I do if the AI refuses to write certain code?
Refusals usually happen for one of two reasons: the code touches a sensitive security area (hacking tools, things that could be misused) or the prompt is ambiguous enough that the AI patterns toward caution. For legitimate tools: add context explaining the use case. “I’m building a security awareness training tool for my company’s HR department” often unlocks code that “build a phishing simulation” alone won’t get. If the AI thinks you’re trying to build something harmful — even when you’re not — the fix is almost always more context about the legitimate purpose. Don’t fight the refusal; explain the context it’s missing.
Can I use the same prompt for different AI tools?
Yes — and I’d encourage you to. The five-component structure is AI-agnostic. A well-written prompt will work across ChatGPT, Claude, and Gemini, though the output style will differ slightly. I often run the same prompt on two different AIs and compare the output — different implementations sometimes reveal tradeoffs you wouldn’t see from a single version. One might produce cleaner code; the other might handle edge cases better. Once you’ve seen both, you can ask your preferred AI to improve its version based on what the other one did better.
How long should my prompt be?
For a simple tool: three to five sentences per component, so fifteen to twenty-five sentences total. For a complex tool: more context, more detailed task specification, more constraints — I’ve written prompts over 400 words for complex tools, and the longer prompt consistently outperforms the shorter one. The length isn’t the issue; specificity is. A twenty-word prompt that’s fully specific beats a two-hundred-word prompt that’s vague. Aim for “says everything that matters” not “short” or “long.” If your prompt is less than five sentences and you’re not getting working code, the prompt needs more specificity, not the AI.
Can AI code get outdated?
Yes — and this is an important practical point. AI coding assistants have training cutoffs, just like conversational AI. They may not know about very recent library updates, new browser APIs, or security vulnerabilities discovered after their training date. For most beginner projects using standard HTML/CSS/JavaScript or simple Python, this doesn’t matter — the fundamentals are stable. Where it matters most: if you’re using a specific library and its API changed recently, the AI might generate code for the old API. The fix: include the library version you’re using in your Language component (“Python 3.12, requests library version 2.31”), or ask the AI “is this code compatible with the latest version of [library]?” after generating it.
Should I explain what the code is for before asking for it?
Yes — that’s the Context component. Explaining the purpose and audience changes the AI’s choices about error handling, comment verbosity, security features, and style. “This is for a security awareness training program that non-technical employees will use” produces different code than “this is a personal script for my own use.” Both versions might work, but the first will have friendlier error messages, more cautious input handling, and probably more defensive security patterns because the context signals that real users with variable behaviour will interact with it.
Further Reading
- Prompt Engineering Day 2 — the full structural framework behind today’s five-component approach
- AI Code Assistant Backdoor Injection — what happens when Constraints are skipped
- Vibe Coding Security Risks — the broader risk picture for AI-generated code
- Replit — run your code online without any installation, perfect for testing
- Cursor — the AI-native code editor for when you want to go further than chat-based coding