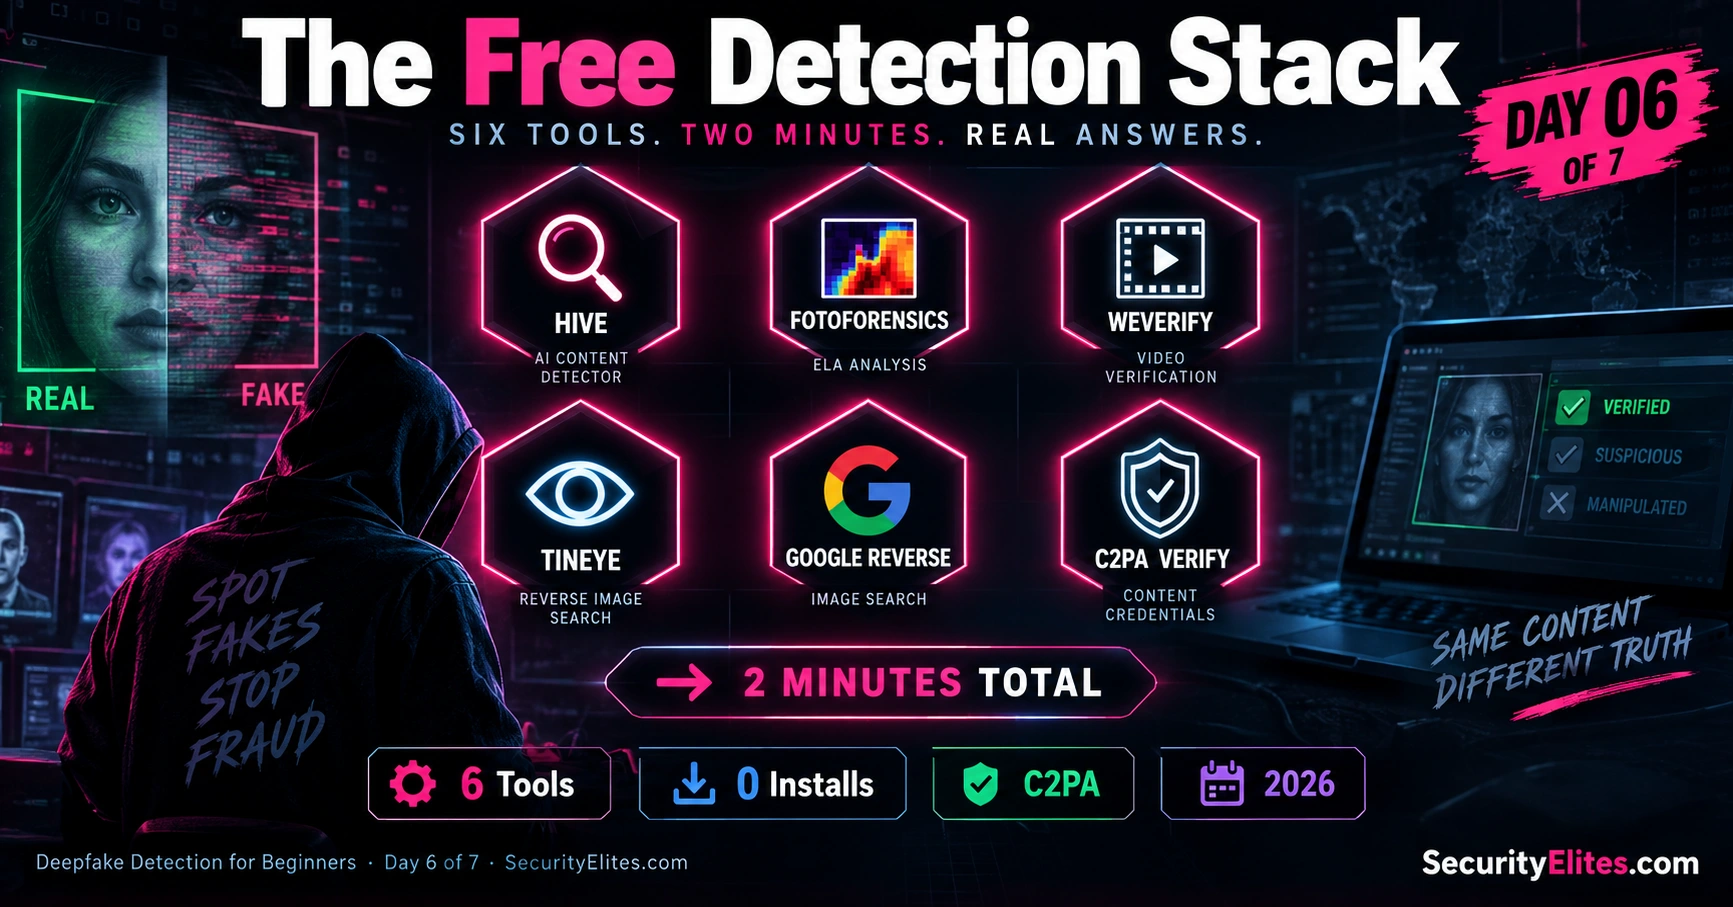
Let me start with a situation I want you to imagine. A journalist receives a photo marked “exclusive” showing a public official at a private event. If the photo is genuine, it could become a major story. Before publishing, she runs a six-step verification workflow. I want you to follow the same sequence with me:
1. TinEye → 2. FotoForensics → 3. Hive Moderation → 4. Google Reverse Image Search → 5. WeVerify → 6. C2PA Content Credentials.
First, TinEye finds the same image from six months earlier, but with a different face. Second, FotoForensics highlights possible editing artifacts around the face. Third, Hive Moderation provides an AI-generation probability estimate. Fourth, Google Reverse Image Search helps locate the original photograph and related versions. Fifth, WeVerify gives us additional verification and visual investigation capabilities. Finally, C2PA lets us check whether the file carries available content credentials or provenance information.
That sequence matters because I’m not asking one detector to make the decision for us. I’m combining reverse-image search, image forensics, AI detection, visual verification, and provenance checks to build a stronger picture. If several checks point in the same direction, I have much more reason to pause before trusting the content.
This is exactly why I want you to take deepfake detection tools free seriously in 2026. You don’t need an expensive forensic workstation to start investigating suspicious content. You can begin with six browser-based tools and a few minutes of structured checking.
In this lesson, I’ll walk you through all six tools in that exact order, show you what each one does well, explain where each can fail, and demonstrate when I would move from one step to the next. By the end, you’ll have a practical detection workflow you can personalise and use whenever a suspicious image or video lands in front of you.
🎯 What You’ll Build in Day 6
⏱ 23 min read · 3 exercises · All tools free in browser
- Days 2–4 complete — you need the artifact checklist (D2), temporal analysis (D3), and audio checks (D4) before tools become useful — tools verify what you already suspect
- Day 5 attack context helpful: Deepfake Attacks Fraud
- 15 minutes to try each tool as you read — the exercise blocks assume active experimentation
Deepfake Detection Tools Free — Day 6 of 7
- The Tool Stack — Six Free Tools, What Each Does
- Hive Moderation — The Generalist Detector
- FotoForensics — ELA for Image Forensics
- WeVerify / InVID — The Journalist’s Video Toolkit
- Reverse Image Search — TinEye and Google
- C2PA Content Credentials — Verifying the Authentic
- Building Your Personal Detection Workflow
- Questions and Answers
Deepfake detection tools free in 2026 give beginners a practical way to start verifying suspicious images and videos without paying for expensive forensic software. I’ve checked each tool in this guide and confirmed that it is accessible without payment. More importantly, I don’t want you to depend on a single detector. Each tool looks at different signals, so I’m going to use them together to cover the weaknesses of one tool with the strengths of another. If the suspicious content is being spread through a domain, I also want you to investigate the source behind it. That’s where the WHOIS Lookup Tool becomes useful. This workflow forms the operational core of the AI Deepfake Hub and connects with the broader LLM Hacking Hub as part of our wider AI security learning cluster.
The Tool Stack — Six Free Tools, What Each Does
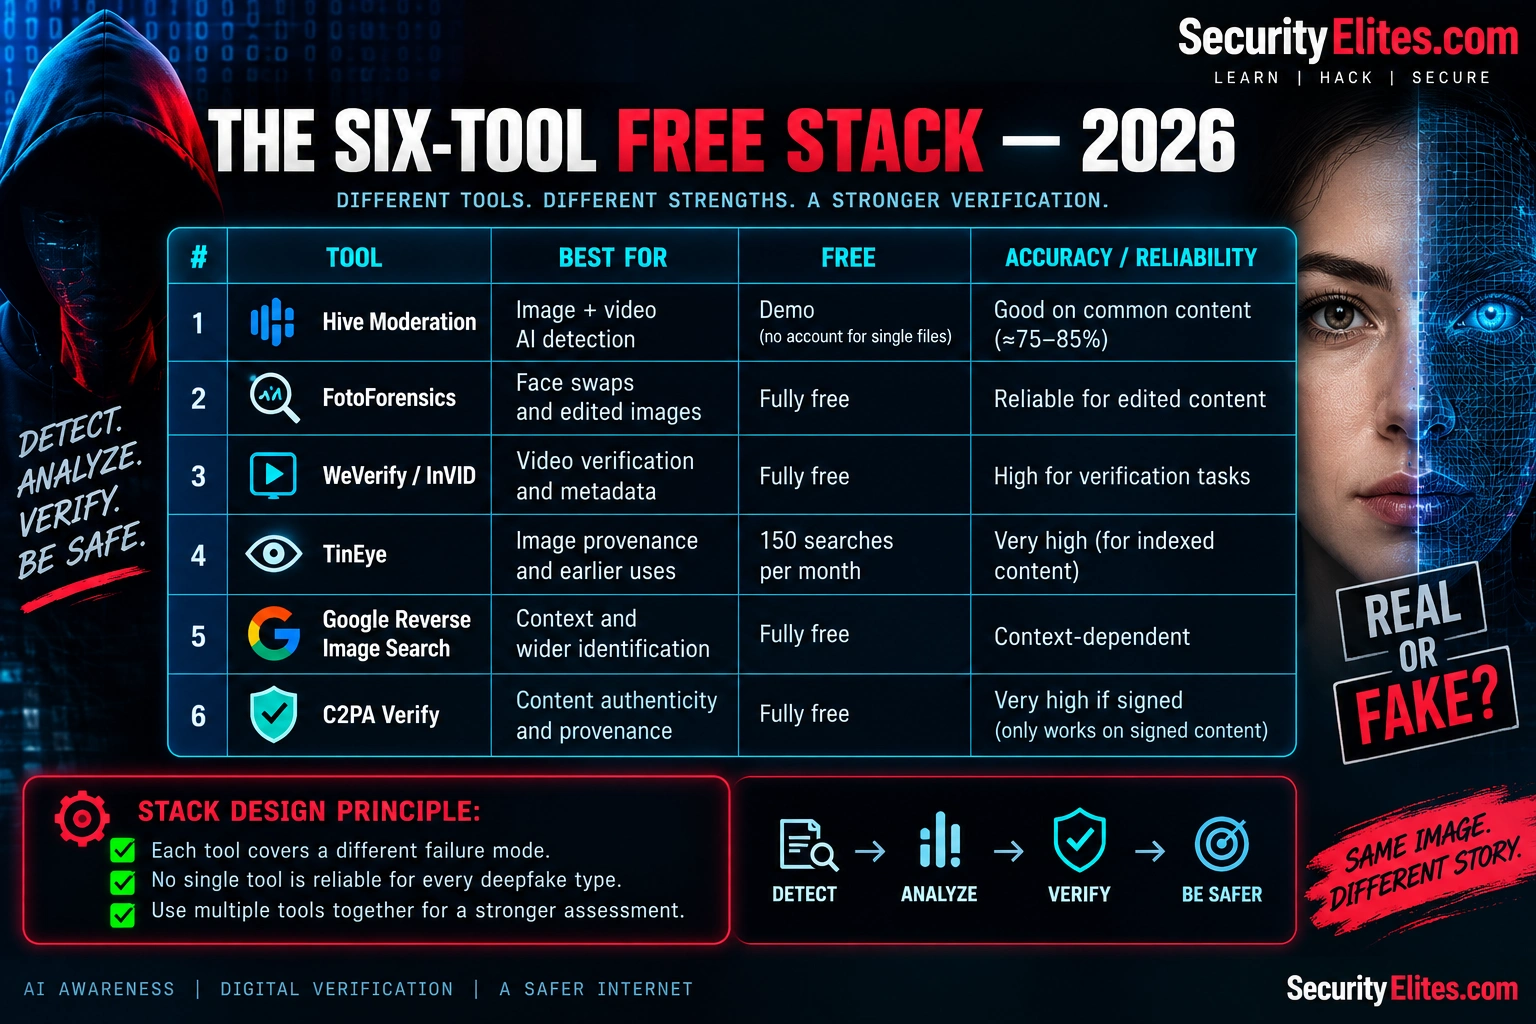
I want to make this practical. I’ve put together six free tools that give us a useful starting stack for deepfake investigation in 2026. Rather than asking one detector to tell us whether something is real or fake, I want you to see how each tool answers a different question.
Think of the workflow as six layers: AI detection → image forensics → video verification → image provenance → contextual search → cryptographic provenance. No single tool can reliably identify every type of deepfake. A synthetic-image detector may recognise a fully generated face but miss a convincing face swap. A forensic tool may reveal editing artifacts but tell us very little about an image that was generated natively by an AI model. Reverse-image search can uncover an older original, while C2PA can provide something fundamentally different — cryptographically signed provenance when it is available.
Here’s the six-tool sequence I want you to learn:
1. Hive Moderation — the AI detection layer. I start here when I want a quick indication of whether an image or video shows characteristics associated with AI generation. You upload the content and receive an AI-detection result. It’s useful as an initial signal, not as a final verdict. Its biggest limitation is that detection performance can vary across image types, generation methods, compression levels, and newer AI models.
2. FotoForensics — the image-forensics layer. Next, I use FotoForensics when I suspect that a real photograph has been manipulated. Its Error Level Analysis (ELA) can highlight differences in JPEG compression that may indicate areas worth investigating. This can be particularly useful when examining possible face-swap or compositing edits. But remember: an ELA result is not automatically proof of manipulation, and it is much less useful for an image that was generated entirely by AI.
3. WeVerify / InVID — the video-verification layer. When the suspicious content is a video, I move here. The toolkit can help extract keyframes and support reverse-image searches and other verification tasks. This changes the investigation because instead of treating a video as one giant file, I can examine individual frames and search for earlier versions or related material. The limitation is straightforward: I need access to the relevant video or URL, and reverse-search techniques cannot prove that a completely new AI-generated video is genuine.
4. TinEye — the provenance-search layer. Now I ask a different question: Has this image appeared somewhere before? TinEye specialises in reverse image searching and can help uncover older versions or previous appearances of an image. That can be extremely useful when a supposedly “new” photograph turns out to have an older source. The limitation is that TinEye can only return material within its indexed database, so a missing result does not mean the image is original.
5. Google Reverse Image Search — the contextual-search layer. I then use Google to broaden the search. Here I’m looking not only for visually similar images, but also for the surrounding context — news reports, websites, articles, and other places where the image may have appeared. This can help me connect an image to its original story or identify a different version of the same photograph. The important lesson is that search results are evidence to investigate, not an automatic authenticity verdict.
6. C2PA Verify — the cryptographic-provenance layer. Finally, I check whether the content carries C2PA Content Credentials. This is different from the other five tools because I’m not asking an AI model to guess whether something looks synthetic. I’m checking whether the content contains cryptographically signed provenance information that can show how it was created or modified. When valid credentials are present, they can provide valuable evidence about a file’s history. When they are absent, however, that does not mean the content is fake — most digital content still does not carry these credentials.
So the complete sequence is simple: Hive → FotoForensics → WeVerify/InVID → TinEye → Google Reverse Image → C2PA Verify. I’m deliberately combining different types of evidence rather than trusting a single percentage or detector. That is the habit I want you to take away from this lesson: detect, inspect, search, verify, and then decide.
Practical Decision Table — Which Tool Should I Use?
When you’re investigating suspicious content, you don’t always need to run every tool. I use the table below to decide where to start. The goal is to match the tool to the question I’m trying to answer.
| What I’m Trying to Find Out | Start With | What I’m Looking For | If the Result Is Unclear |
|---|---|---|---|
| Does this image look AI-generated? | Hive Moderation | AI-generation detection signal | Check FotoForensics and reverse-image search |
| Has a real photograph been edited? | FotoForensics | Possible compression or editing inconsistencies | Search for the original with TinEye and Google |
| Is this video authentic or reused? | WeVerify / InVID | Keyframes, previous versions, metadata and visual context | Reverse-search several important frames |
| Where did this image originally appear? | TinEye | Older or earlier indexed appearances | Repeat the search with Google Reverse Image |
| What is the wider context of this image? | Google Reverse Image | News articles, websites, related images and surrounding context | Compare results with TinEye and investigate the earliest credible source |
| Does the file have verified provenance? | C2PA Verify | Valid Content Credentials and provenance information | Treat missing credentials as inconclusive and continue with other checks |
| I have a suspicious image and want maximum confidence | Run all six | Agreement or contradictions across independent evidence | Stop and investigate conflicting evidence before publishing or sharing |
Hive Moderation — The Generalist Detector
When I receive a suspicious image and need a quick first signal, Hive Moderation is one of the first tools I reach for. The reason is simple: it gives me a fast AI-generated-content assessment without requiring me to begin with complicated forensic analysis. Hive currently provides free AI-detection tools that can accept uploaded files or media URLs and return detection results and confidence signals.
I treat Hive as Step 1 of the investigation, not the final judge. My first question is not “Is this definitely fake?” It is “Is there enough evidence here to justify a deeper investigation?” That distinction is important because an automated detector is making a model-based assessment of the media. It is not establishing the historical truth of the photograph, identifying the original photographer, or proving that somebody manipulated the file.
My Hive Workflow
I start by opening Hive’s AI-generated-content detection tools and submitting the suspicious image or supported media URL. Hive says its detection capability covers AI-generated and deepfake images and video, and its current tooling is designed to provide confidence signals that can help with review and investigation.
Once the result appears, I record three things: the detection result, the confidence signal, and the exact file I submitted. That last point is easy to overlook. If I resize, recompress, screenshot, crop, or otherwise modify an image before testing it, I may no longer be testing exactly the same artifact that appeared online.
I also save the original URL or source page when possible. My goal is to preserve the investigation trail: where did the content come from, what exact file did I test, what did Hive report, and what did the other verification methods show?
How I Interpret the Result
I don’t use an arbitrary percentage threshold such as “above 80% means fake.” That sounds precise, but it can give beginners a false sense of certainty. Hive describes its outputs as confidence signals, and the meaning of a particular score depends on the content, model, and detection task.
Instead, I use a simple three-level approach:
- Strong AI signal: I treat the result as a reason to investigate further, not as permission to immediately label the content fake.
- Uncertain or borderline signal: I escalate immediately to image forensics, reverse-image search, and manual inspection.
- Weak or absent AI signal: I do not automatically call the content authentic. A detector can miss manipulated content, so I continue with provenance and contextual checks when the stakes are high.
This is the mindset I want you to develop: the detector tells me what to investigate next; it doesn’t replace the investigation.
Where Hive Helps Most
Hive is particularly useful when I am dealing with large amounts of suspicious media and need an initial screening signal. Its current AI-generated-content detection offering covers images and video, and Hive also describes use cases involving synthetic images, deepfake profile photos, manipulated visual media, and other forms of AI-generated content.
That makes it useful as the first layer in my workflow. If I have 20 suspicious images, I don’t necessarily want to perform detailed forensic analysis on all 20 immediately. A quick automated screening step can help me decide which files deserve closer attention.
Hive also continues updating its coverage for newer generative engines, according to its current product documentation. That matters because synthetic-media detection is a moving target: techniques that work well against one generation of models may not perform identically against newer generation methods.
Where I Don’t Trust Hive Alone
This is the most important part of the lesson. I never interpret a Hive result as proof of authenticity or manipulation by itself.
A reverse-image search can answer a question Hive cannot: Where did this image appear before? FotoForensics can give me a different type of evidence about possible editing. WeVerify can help me investigate video frames. C2PA can tell me whether verifiable content credentials are present. These are fundamentally different evidence sources.
That is why a clean Hive result does not end my investigation when the content is important. If someone sends me a supposedly exclusive photograph of a public official, for example, I still want to know whether an older version of the image exists, whether the face has been composited, whether the surrounding context matches the claim, and whether provenance information is available.
A Practical Example
Suppose I receive a photograph claiming to show a celebrity at an event yesterday. I upload the original file to Hive and receive a strong AI-generation signal. I don’t immediately publish “AI-generated.” Instead, I write down the result and move to the next layer.
I send the same original file through FotoForensics and inspect the areas around the face. I then use TinEye and Google Reverse Image Search to look for earlier appearances. If it is a video, I switch to WeVerify/InVID and investigate keyframes. Finally, I check for C2PA Content Credentials where appropriate.
Now I have something much more useful than a single detector score. I have several independent pieces of evidence that I can compare. If they agree, my assessment becomes stronger. If they disagree, that disagreement is itself a signal that I need to investigate further.
My Rule for Hive
Use Hive to screen. Use other tools to investigate.
That’s the habit I want you to remember. A high-confidence automated detection result deserves attention, but it doesn’t eliminate the need for verification. A low-confidence or negative result doesn’t prove that the content is genuine. I use Hive to decide where to look next, then build the case using forensic analysis, reverse-image search, contextual verification, and provenance evidence.
Your Hive Moderation Action Checklist
Now I want you to use Hive as your first screening step. Pick an image or video you are authorised to examine and work through these steps in order.
- Preserve the original. Save the original image or video before resizing, cropping, screenshotting, or recompressing it.
- Open Hive’s AI detection tool. Upload the original file or use a supported media URL.
- Record the result. Write down the AI-detection result and any confidence information Hive provides. Don’t rely on memory or a screenshot alone.
- Don’t turn the score into a verdict. A strong AI signal means investigate further; it does not automatically prove that the content is fake. Likewise, a weak signal does not prove that the content is authentic.
- Look at the content yourself. Check the face, hands, reflections, lighting, background details, text, and other areas for inconsistencies that deserve investigation.
- Record your observation. Write something precise such as “Hive returned a strong AI-generation signal” rather than “Hive proved this is a deepfake.”
- Move to independent checks. For images, use FotoForensics, TinEye, and Google Reverse Image Search. For videos, use WeVerify/InVID and investigate useful keyframes.
- Check provenance when available. Look for C2PA Content Credentials or other reliable source information that can help establish the content’s history.
- Compare the evidence. If several independent checks support the same explanation, your assessment becomes stronger. If they disagree, treat the disagreement as a reason to investigate further.
FotoForensics — ELA for Image Forensics
After I get an initial signal from Hive, I often want a completely different type of evidence. That is where FotoForensics becomes useful. Instead of asking an AI model whether an image looks synthetic, I’m looking for signs that different parts of the image may have been processed differently.
This distinction matters. FotoForensics does not tell me “this is a deepfake.” Its forensic visualisations give me clues that can help identify areas worth investigating. I then compare those clues with the original image, reverse-image results, metadata, and the other tools in this workflow.
What Is ELA?
ELA stands for Error Level Analysis. The basic idea is that JPEG compression changes image data. When a JPEG is saved, information is compressed and some detail is discarded. If an image has been edited and different regions have experienced different processing histories, those regions can sometimes respond differently when the image is recompressed for analysis.
FotoForensics can visualise those differences. In a typical ELA image, areas with stronger visible differences may appear brighter or otherwise stand out from neighbouring regions. That can make an edited area worth investigating.
But this is where I want you to avoid one of the most common beginner mistakes: bright does not automatically mean fake. A bright area can result from legitimate editing, different image textures, sharp edges, previous compression, resizing, or other processing. ELA is evidence of a possible difference in compression behaviour, not a laboratory certificate proving manipulation.
Why I Use It for Suspected Face Swaps
Face swaps are an interesting case because the surrounding photograph can be genuine while one important region has been replaced or substantially modified. If the replacement face has a different processing history from the surrounding image, forensic analysis may reveal an inconsistency around the edited region.
For example, imagine an authentic photograph of a person standing at a conference. Someone replaces the person’s face while leaving the clothing, background, lighting, and most of the original photograph untouched. I don’t want to rely only on an AI detector in that situation. I also want to examine whether the face region behaves differently from the surrounding image.
That is where ELA can become useful. I look for patterns that make sense in context, rather than simply searching for the brightest pixels.
My FotoForensics Workflow
I keep the workflow simple:
- Preserve the original. I save the original file before opening it in an editor, messaging application, or screenshot tool.
- Upload the original image. I avoid testing a screenshot or repeatedly recompressed copy if the original file is available.
- Open the ELA analysis. I examine the entire image before concentrating on the face or suspected region.
- Look for unusual patterns. I check whether a region behaves differently from visually comparable areas around it.
- Compare with the normal image. I return to the original photograph and ask whether the ELA pattern corresponds to something obvious, such as an edge, text, object boundary, or legitimate edit.
- Cross-check the finding. I use reverse-image search, metadata, visual inspection, and the other tools in the stack before drawing a conclusion.
The sixth step is the one I don’t want you to skip. An interesting ELA result is a lead. My job is to find out whether that lead survives independent verification.
What I Look for in the ELA Result
I don’t use a single visual rule such as “bright face equals face swap.” Instead, I ask several questions.
- Does the suspected region behave differently from nearby regions?
- Is the difference consistent with the physical structure of the image?
- Does the boundary follow a suspicious shape rather than a normal object edge?
- Are there similar anomalies elsewhere in the image?
- Does the original image show evidence of legitimate retouching or recompression?
- Can I find an earlier version of the image that explains the difference?
That last question is especially powerful. If I find an older version of the same photograph and the person’s original face is different, I have much stronger evidence than an ELA image alone could provide.
ELA Versus Hive — Why I Use Both
Hive and FotoForensics answer different questions, which is exactly why I put them next to each other in this workflow.
| Question | Hive Moderation | FotoForensics / ELA |
|---|---|---|
| What does it examine? | Signals associated with AI-generated content | Image-compression and forensic patterns |
| Useful for suspected AI generation? | Yes, as a detection signal | Limited as a standalone method |
| Useful for suspected image editing? | Potentially, but not specifically designed to prove editing | Yes, as a forensic clue |
| Can it identify the original image? | No | No |
| Can it prove manipulation by itself? | No | No |
This is why I don’t think of these tools as competitors. Hive gives me one type of evidence. ELA gives me another. Reverse-image search can then provide a completely different type of evidence by showing me where the image appeared previously.
The Limitations You Need to Understand
ELA is particularly sensitive to the image’s processing history. A photograph that has been resized, recompressed, exported by different software, edited professionally, or passed through an online platform can contain perfectly legitimate compression differences.
That means I am careful with images downloaded from social media. The platform may have resized or recompressed the file before I ever received it. If I run ELA on that version, some of the patterns I see may reflect the platform’s processing rather than an attacker’s manipulation.
The same problem applies to screenshots. If someone sends me a screenshot of an image instead of the original file, I know that the screenshot itself has introduced another processing step. I can still investigate it, but I treat the forensic result with more caution.
What About Fully AI-Generated Images?
This is another important limitation. If an image was generated as a complete synthetic image rather than created by modifying an existing photograph, there may be no simple “edited region” for ELA to identify.
In that situation, I put more weight on the other layers of the workflow: AI-generation detection, visual inspection, reverse-image search, contextual verification, and content provenance where available.
In other words, ELA is not something I run because every deepfake leaves an ELA fingerprint. I run it when the investigation involves a file where differences in image processing may help answer whether particular regions deserve closer examination.
A Practical Example
Imagine I receive a photograph claiming to show a public figure at a private event. Hive gives me an uncertain AI-detection result. I don’t stop there.
I upload the original image to FotoForensics and examine the ELA output. I notice that the face region looks different from several surrounding regions. That gives me a reason to investigate the face more closely, but I still don’t call it a deepfake.
Next, I run the image through TinEye and Google Reverse Image Search. I find an older photograph from months earlier showing the same scene, but the person has a different face. Now the evidence has changed substantially: the ELA anomaly is no longer an isolated observation; it is consistent with an independently discovered earlier version of the image.
That is the workflow I want you to learn. ELA gives me a clue. Reverse search gives me history. Context gives me meaning. Together, they can produce a much stronger assessment than either tool could provide alone.
Your FotoForensics Action Checklist
Now I want you to try this yourself. Use an image you are authorised to examine and work through these steps in order.
- Save the original file. Don’t start with a screenshot or a copy that has been repeatedly compressed if the original is available.
- Open FotoForensics. Upload the image and run the available forensic analysis.
- Start with the whole image. Don’t immediately zoom in on the face. First look at the overall ELA pattern and identify regions that behave differently.
- Inspect the suspected area. If the face, hands, text, or another region looks unusual, compare it with surrounding areas.
- Ask why the difference exists. Could it be a normal object boundary, text, resizing, recompression, professional retouching, or another legitimate editing operation?
- Record the observation. Write down exactly what you saw rather than writing “deepfake detected.” For example: “The face region shows a different ELA pattern from the surrounding image.”
- Cross-check the image. Run the original through TinEye and Google Reverse Image Search to look for earlier versions and surrounding context.
- Compare the evidence. If the ELA anomaly and an earlier source point toward the same manipulation, your assessment becomes stronger. If they disagree, investigate the disagreement rather than forcing a conclusion.
WeVerify / InVID — The Journalist’s Video Toolkit
When the suspicious content is a video, I change my approach. Instead of asking only whether the video looks AI-generated, I start asking where it came from, whether the footage existed before, whether individual frames tell the same story, and whether the claimed location and context make sense. That is where WeVerify / InVID becomes useful.
WeVerify is not a conventional deepfake detector that gives me a simple “real” or “fake” percentage. It is a verification toolkit designed to help investigate online visual content. That makes it particularly useful for deepfake investigations because many manipulated videos also involve misleading provenance, reused footage, altered context, or fabricated claims about where and when the video was recorded.
Getting Started
I can approach the toolkit in two ways: through the browser extension where available, or through the web-based verification tools. Before installing anything, I check the current official WeVerify resources because extension availability and supported browsers can change.
Once I have access to the verification tools, I keep the original video URL and, when possible, download or preserve the original file for analysis. I don’t want my investigation to depend entirely on a social-media player because platforms can resize, recompress, crop, or otherwise transform uploaded videos.
1. Extract Keyframes and Search Them
This is one of my favourite parts of the workflow. A video may contain hundreds or thousands of individual frames, but I don’t need to reverse-search every frame. I want to identify frames that contain useful information: a person’s face, a distinctive building, a sign, a vehicle, a landscape, or another visually unique element.
I extract representative keyframes and reverse-search them. I can then compare those frames with results from image-search services and look for earlier versions of the footage.
This is extremely useful when a supposedly new video is actually recycled footage. For example, a video might be presented as “This happened yesterday.” A keyframe search may reveal that the same scene appeared online several years earlier in a completely different context.
Notice what happened there: I didn’t need an AI detector to identify the problem. Provenance exposed the problem.
How I Choose Useful Keyframes
I don’t simply accept the first frame extracted by the tool. I look for frames that have searchable visual features.
- Faces: useful when searching for earlier appearances of the person or scene.
- Signs and text: often excellent clues for identifying locations.
- Buildings and landmarks: useful for geolocation and previous-source searches.
- Vehicles: licence-plate regions, markings, or distinctive vehicle models can provide context.
- Unique objects: anything visually distinctive can make a reverse-image search more useful.
If one frame produces nothing, I don’t conclude that the video is original. I try another frame. Search engines have different indexes and different matching capabilities, so a negative result is not proof of originality.
2. Investigate Video Metadata
The next question I ask is whether the file contains useful metadata. Depending on how the video was created and processed, metadata can potentially include information such as the software or device used, timestamps, codecs, dimensions, and other technical properties.
I compare whatever information is available with the story attached to the video.
For example, if someone claims a video was recorded on a particular phone at a particular time, but the available technical information indicates a completely different processing history, I flag the discrepancy for investigation.
But metadata needs the same caution as every other forensic clue. Social platforms and editing software can remove or rewrite metadata. A missing timestamp does not mean the video is fake, and an apparently valid timestamp does not prove that the event happened as claimed.
Metadata tells me about the file’s technical history, not necessarily the truth of the story surrounding the file.
3. Use Geolocation to Test the Claim
Location claims are another powerful verification opportunity. Suppose a video is described as being recorded outside a particular airport, government building, stadium, or city. I don’t simply accept the caption. I look for physical clues inside the footage.
I examine:
- building shapes and architectural details,
- road layouts and street furniture,
- signs and visible language,
- mountains, coastlines, or other geographic features,
- vehicle markings and road signs,
- sun position and shadows where the evidence is strong enough to be useful.
The important word is corroboration. I want multiple clues pointing toward the same location rather than trying to identify a place from one ambiguous landmark.
4. Reconstruct the Video’s Provenance
This is where WeVerify becomes especially valuable for me. I try to reconstruct the video’s journey.
Where did I first find it? Who posted it? Is there an earlier upload? Does an original source exist? Has the video been cropped or edited? Do older versions show the same event? Does the earliest credible source support the current claim?
Imagine that a social-media account posts a video claiming to show a breaking event. I find an identical keyframe in an older article published years earlier. I then discover that the current version has been cropped and the caption has changed. At that point, the central problem isn’t necessarily that the video itself was AI-generated. The problem is that genuine footage is being presented with false context.
That distinction is important because misinformation doesn’t require generative AI. Deepfake investigations should therefore include provenance and context verification, not just synthetic-media detection.
5. What Happens With Completely New AI Video?
This is where I want to set realistic expectations. Suppose an AI model generates a completely new video that has never existed anywhere else. There may be no older version for reverse-image search to find. If the file has also been processed or stripped of useful metadata, provenance analysis becomes more difficult.
WeVerify can still help me investigate individual frames, context, and available technical information, but it cannot magically recover provenance that never existed.
For genuinely novel synthetic video, I therefore combine the toolkit with other layers of the detection stack: AI-generation detection, frame-by-frame visual inspection, audio analysis where appropriate, contextual verification, and C2PA Content Credentials when available.
A Practical Example
Let’s say I receive a 20-second video claiming to show a public figure making a controversial statement at an event.
- I preserve the original URL and file.
- I extract several useful keyframes.
- I reverse-search the strongest frames.
- I investigate available metadata.
- I examine the claimed location.
- I compare the earliest credible version I can find with the current version.
- I then use other detection tools if the evidence still suggests possible synthetic manipulation.
Suppose the reverse search finds the original event video, but the original speaker never says the controversial sentence. Now I have something much stronger than “the video looks suspicious.” I have a source video against which I can compare the current version.
The Limitations I Keep in Mind
WeVerify is powerful because it gives me many investigative capabilities in one workflow, but it does not eliminate the fundamental problems of online verification.
- No search result does not mean no earlier source exists. The original may simply be outside the search engine’s index.
- Missing metadata does not prove manipulation. Platforms and editing software frequently remove metadata.
- A matching older video does not automatically prove the current video is fake. It may simply be the same legitimate footage being reposted.
- Geolocation can be ambiguous. Similar architecture and landscapes can exist in multiple places.
- Keyframe analysis cannot prove novel AI generation. Completely synthetic footage may have no historical source to discover.
My Rule for WeVerify / InVID
Don’t ask only “Does this video look fake?” Ask “Can I verify where this video came from?”
That change in thinking is extremely useful. A convincing deepfake may survive a visual inspection, but it can still fail a provenance investigation. Conversely, genuine footage can be misleading when it is given a false date, location, or context.
Your WeVerify / InVID Beginner Action Checklist
Now I want you to try the workflow yourself. Choose a public video or another piece of content you are authorised to investigate, and work through these steps in order.
- Save the source. Copy the original video URL and, where permitted, preserve the original file. Don’t rely only on a social-media player.
- Pick useful frames. Extract several keyframes containing faces, signs, buildings, vehicles, text, or other distinctive details.
- Reverse-search the frames. Search the strongest keyframes and look for older uploads, news reports, photographs, or versions of the same scene.
- Check the timeline. If you find an earlier version, compare its publication date and context with the claim attached to the current video.
- Inspect available metadata. Look for technical information that can help explain how the file was created or processed. Treat missing metadata as inconclusive.
- Check the location. Compare visible signs, buildings, roads, landmarks, and other physical clues with the location being claimed.
- Compare versions. Look for differences in cropping, audio, frames, text, faces, or other important content between the current video and earlier versions.
- Record what you found. Write down the source URL, useful keyframes, earlier sources, metadata observations, and location evidence so another person can follow your reasoning.
- Escalate when necessary. If the provenance remains unclear or the video appears synthetically manipulated, continue with Hive, frame-level inspection, reverse-image searches, and C2PA checks where available.
Today’s exercise runs the full stack on 5 real test items like a professional analyst would. This is the exercise that converts Days 1 through 5 knowledge into actual operating skill. Don’t rush it — the first full workflow run takes about 30 minutes. Every subsequent one takes 5. That skill acquisition curve is exactly what we’re building here.
- Collect 5 test items: (a) 2 images — one you’re confident is real, one clearly AI-generated from thispersondoesnotexist.com; (b) 1 video — any social media clip you’re genuinely uncertain about; (c) 1 audio clip — an ElevenLabs demo voice or a WhatsApp voice message; (d) 1 social media post with an image claim that struck you as too convenient.
- For each item, run the appropriate tool stack from Section 7’s decision tree. Document tool name, result or score, and your interpretation in a simple table.
- Make a final determination for each: Real, Fake, or Uncertain. Uncertain is a legitimate result — never force a verdict the tools don’t support.
- For uncertain items, note what additional evidence would tip you toward Real or Fake. This trains your escalation instincts for future workflow decisions.
- Time your workflow. What would you skip in a 30-second quick check? What would you never skip on high-stakes content? Write both protocols down — quick and thorough.
Reverse Image Search — TinEye and Google
Reverse image search is one of the most useful parts of my deepfake workflow because it asks a question that an AI detector cannot answer: “Has this image appeared somewhere before?” That question becomes extremely powerful when someone has taken a genuine photograph, changed the face, and presented the result as a new event.
I don’t treat reverse-image search as a standalone deepfake detector. Instead, I use it as a provenance and context investigation. If I can find an older version of the same photograph, identify the original subject, or discover that the image has been circulating with completely different claims, I have evidence that a simple AI probability score cannot provide.
TinEye — Finding Earlier Appearances
TinEye is the first reverse-image service I use when my main question is provenance. I upload the image and examine the matching results for earlier or related appearances.
What I care about most isn’t simply the number of matches. I want to understand the timeline. If the supposedly “new” photograph appears on a credible website months or years before the event described in the current claim, that changes the investigation immediately.
I also compare the versions visually. Is the older image identical? Is the face different? Has the image been cropped? Has text been added? Is the current version a composite? These details can turn a generic search result into useful forensic evidence.
TinEye’s own index is not the entire internet, so I never interpret “no results” as “this image is original.” It simply means TinEye did not find a useful match in its indexed material.
Google Reverse Image Search — Finding Context
After TinEye, I use Google’s image-search capabilities to broaden the investigation. My question changes slightly: “Where else is this image being used, and what context is attached to it?”
This can uncover news articles, websites, visually similar images, public posts, and other pages that help explain the image’s history. Sometimes the most important discovery isn’t an exact duplicate. It is a visually similar or related image that leads me to the original event, photographer, person, or publication.
Google’s results also require interpretation. Search engines may return visually similar material that is not the same photograph, and an image appearing on a website does not automatically establish that the website is the original source.
Why I Use Both
I use TinEye and Google together because they provide complementary search perspectives.
| What I Want to Know | Tool I Start With | What I Look For |
|---|---|---|
| Has this exact image appeared before? | TinEye | Earlier indexed appearances and related versions |
| How old might this image be? | TinEye | Older dated matches and earliest useful evidence |
| What story is attached to this image? | Google Reverse Image | Articles, websites, posts, and surrounding context |
| Can I identify the original event or source? | Both | Matching photographs, original reporting, photographer or organisation |
| Could this be a new AI-generated image? | Hive + other checks | AI-detection signals combined with visual and provenance evidence |
The Workflow I Use for Suspicious Portraits
Portrait deepfakes deserve a slightly different approach because the face itself may be the manipulated element.
- Preserve the original image. I save the exact file or source URL before editing or cropping it.
- Run TinEye. I look for earlier versions and compare the dates and image content.
- Run Google Reverse Image Search. I look for the image in articles, profiles, websites, and other contexts.
- Compare the face carefully. If an older version contains the same scene but a different face, I investigate that discrepancy.
- Check the claimed identity. If the face appears elsewhere belonging to a different person, I treat that as an important identity-verification lead.
- Use Hive or another AI detector. If the reverse search doesn’t explain the image, I use AI-detection tools as another evidence layer.
- Use FotoForensics where appropriate. If I suspect that an authentic photograph has been modified, I inspect the file for forensic clues.
When a Reverse Search Reveals Another Person
Imagine I receive a photograph supposedly showing Person A. I search the image and find an older professional profile showing the same photograph, but the person is identified as Person B.
That is a significant finding, but I still describe it accurately. I don’t immediately write “AI deepfake confirmed.” The evidence could indicate a stolen photograph, identity misrepresentation, face replacement, or another form of image misuse.
I compare the images pixel-for-pixel where practical, inspect the face and surrounding areas, check publication dates, and look for an original source. If the current image contains Person A’s claimed identity while the earlier photograph clearly contains Person B, I now have a strong reason to investigate possible identity manipulation.
What If Neither Search Finds Anything?
This is where beginners often make a mistake. No reverse-image result does not mean “real.”
The image may be genuinely new, but it may also be too recent, too obscure, heavily cropped, poorly indexed, or generated entirely by AI. Search engines cannot find a source that they have never indexed.
When I get no useful matches, I simply move to the next layer. I check the image with Hive, inspect it manually, examine it with FotoForensics when appropriate, and look for C2PA Content Credentials or other provenance information.
Watch for the Context Trap
Finding the same image online isn’t enough. I always read the surrounding context.
A photograph might genuinely show the person and event being claimed, but the date could be wrong. Alternatively, the image could be real but associated with a completely different event. Someone can therefore create misinformation without changing a single pixel.
That’s why I ask four separate questions:
- Is this the same image?
- Where did it appear first or earliest in the available evidence?
- What event and person did the original source identify?
- Does that context match the current claim?
Only after answering those questions do I decide what the reverse search actually tells me.
Your Reverse Image Search Action Checklist
When you receive a suspicious image, I want you to follow this quick sequence:
- Save the original. Keep the exact image or source URL before cropping or editing it.
- Search with TinEye. Look for older matches and compare dates and versions.
- Search with Google. Look for news articles, websites, profiles, and related images.
- Compare versions. Check faces, backgrounds, cropping, text, and other visible changes.
- Verify the context. Confirm that the person, event, location, and date match the current claim.
- Record the evidence. Save useful source pages and note what each search actually established.
- No match? Don’t conclude “real.” Move to Hive, FotoForensics, and C2PA or other provenance checks.
C2PA Content Credentials — Verifying Provenance
This is the part of the workflow I find most interesting because C2PA changes the question. With the first five tools, I’m looking for evidence that helps me determine whether content may have been generated, edited, reused, or taken out of context. With C2PA Content Credentials, I’m asking a different question: Does this file carry cryptographically verifiable information about where it came from and what happened to it?
C2PA stands for the Coalition for Content Provenance and Authenticity. It is an open technical standard for recording and verifying provenance information about digital content. The current C2PA 2.3 specification supports cryptographically signed provenance data covering things such as creation, editing actions, ingredients, and other assertions associated with an asset.
C2PA Is Not a Deepfake Detector
I want to make this distinction very clear before you use it. C2PA does not look at a photograph and decide that it “looks fake.” It verifies whether provenance assertions associated with the asset are cryptographically bound to it and whether those assertions have been tampered with. The C2PA specification deliberately avoids making a value judgment about whether the content itself is “good,” “bad,” authentic, or deceptive.
That makes C2PA complementary to Hive, FotoForensics, WeVerify, TinEye, and Google Reverse Image Search rather than a replacement for them.
Think about the difference:
- Hive: Does the media show signals associated with AI generation?
- FotoForensics: Are there image-processing patterns worth investigating?
- WeVerify/InVID: Can I investigate the video’s frames, source, and context?
- TinEye: Has this image appeared elsewhere?
- Google Reverse Image: What wider context can I find?
- C2PA: Is there verifiable provenance attached to this particular asset?
How Content Credentials Work
A C2PA-enabled workflow can attach a digitally signed manifest to an asset. That manifest can contain assertions describing aspects of the asset’s history. The information can include creation details, editing actions, ingredients used to create a composite asset, and other provenance information supported by the implementation.
The important technical property is the cryptographic binding. C2PA uses digital signatures and cryptographic hashes to associate the provenance information with the asset. If the protected content or associated provenance is modified in a way that breaks that binding, verification can detect the problem.
That is very different from ordinary metadata such as a camera’s EXIF information. EXIF can be useful, but it isn’t by itself a cryptographically authenticated chain of provenance. C2PA is designed specifically to make provenance information tamper-evident and machine-verifiable.
My C2PA Verification Workflow
When I receive an important image or video, I don’t wait until the end of the investigation to check provenance. If Content Credentials are available, I want to know that early.
- Preserve the original. I keep the original file or source URL whenever possible.
- Look for the Content Credentials indicator. Some compatible experiences display the Content Credentials pin or related provenance information.
- Open the provenance information. I inspect what the credential actually says rather than treating the presence of the icon as the conclusion.
- Check the creation information. I look at the claimed creation method, device, software, or other available assertions.
- Review the edit history. If the credential contains recorded actions, I look at what was changed and when.
- Check the signer and verification status. I want to know whether the credential validates successfully and whether the signing implementation is recognised within the C2PA trust framework.
- Compare the provenance with the story. If the file claims to be an untouched camera photograph but the provenance records AI generation or subsequent editing, that difference matters.
- Cross-check with the other tools. C2PA is one evidence layer, not a substitute for contextual and forensic investigation.
A Simple Example
Imagine that I receive a photograph described as an untouched photograph taken by a camera at a particular event.
The file contains valid Content Credentials. I inspect the provenance and discover that the asset was captured by a compatible workflow and later passed through an editing application. That doesn’t automatically make the photograph deceptive. It tells me something important about its history: the file has undergone a recorded change.
Now imagine the credential identifies an AI-generation action. Again, I don’t need to guess what happened from pixels alone. I have provenance information indicating that AI was involved in the asset’s lifecycle.
The opposite situation is equally important. If I receive an image with no Content Credentials, I don’t label it fake. It simply means this particular provenance mechanism cannot provide evidence for that file. C2PA is opt-in and depends on compatible creation, editing, publishing, and preservation workflows.
C2PA and AI-Generated Content
The current C2PA ecosystem is becoming more useful for AI transparency. C2PA’s 2026 guidance describes machine-readable information that can identify whether an asset was generated by a model, enhanced by AI, captured by a device, or edited by a person. It also describes AI-disclosure information and the ability to identify particular regions or actions associated with AI modification.
This is important because “AI-generated” is not always a simple yes-or-no situation. An image might be camera-captured and then have its background expanded with generative AI. Another image might be entirely generated. A third might be a normal photograph with conventional editing.
A detailed provenance record can potentially distinguish those different histories instead of reducing everything to one binary label.
The Limitations I Want You to Remember
C2PA is powerful, but it has an important limitation: absence of credentials is not evidence that content is fake.
If someone screenshots an image, downloads it through a platform that doesn’t preserve its credentials, or receives content from a workflow that never created credentials in the first place, the provenance information may not be available to you.
There is also an important distinction between cryptographic validity and truthfulness of the underlying claim. A valid credential can tell me that a particular provenance assertion is cryptographically associated with the asset. It does not automatically prove that every real-world statement surrounding that asset is true. C2PA itself describes provenance as information that helps users assess content; it does not make the value judgment for them.
That’s why I still compare the credential with the actual content and its surrounding context.
Why the Signer Matters
Another concept beginners often miss is the difference between seeing a credential and understanding who signed it.
C2PA has a trust framework involving certificates and a Trust List, while its Conformance Program provides a way to identify implementations that meet specified technical and security requirements.
So when I inspect a credential, I don’t stop at “there is a Content Credential.” I also ask: Who signed this? What does the credential claim? Does the verification succeed? Is the signing implementation recognised within the relevant trust framework?
Why I Want You to Learn C2PA Now
C2PA adoption is expanding across the digital-media ecosystem. The C2PA organisation reported in February 2026 that more than 6,000 members and affiliates had live applications of Content Credentials, while its current specification continues to evolve.
That doesn’t mean every photograph or video you encounter will suddenly have a credential. It means provenance is becoming an increasingly important part of the digital-media workflow.
For me, the practical lesson is simple: don’t wait for Content Credentials to become universal before learning how to read them. Start treating provenance as another evidence layer now. When credentials exist, understand what they tell you. When they don’t exist, continue with the other five tools.
Building Your Personal Detection Workflow
Six tools are useful only when I know when to use each one and what to do with the result. Otherwise, I simply have six browser tabs open and no investigation plan. In this section, I’m going to turn the six tools into a workflow you can actually remember and customise for your own needs.
My basic principle is simple: screen quickly, investigate the right evidence, compare independent signals, and escalate when the stakes are high. I don’t use one percentage or one detector as the final decision-maker.
Step 1 — The 30-Second Quick Check
For an unfamiliar image or video, I start with Hive Moderation as a quick screening layer. I preserve the original file, submit it, and record the result.
If Hive gives me a strong AI-generation signal, I treat that as a reason to investigate further. If the result is weak or inconclusive, I don’t automatically declare the content genuine. A detector can miss manipulated or newly generated content.
For low-stakes material, that initial signal may be enough to decide whether I need to spend more time investigating. For high-stakes content, I skip the shortcut and go directly to independent verification regardless of the Hive result.
Step 2 — If It’s an Image
For a suspicious image, I use four complementary checks:
- Hive: Get an initial AI-generation signal.
- FotoForensics: Look for image-processing patterns that deserve investigation, particularly when I suspect compositing or face manipulation.
- TinEye + Google Reverse Image: Search for earlier versions, original sources, and surrounding context.
- Manual visual inspection: Check faces, hands, reflections, lighting, text, edges, and other details using the visual checklist from Day 2.
I don’t count the number of tools that “agree” and convert that number into a mathematical confidence percentage. Instead, I ask whether the evidence is independent and mutually consistent.
For example, a strong AI-detection signal combined with an older original photograph showing a different face gives me a much stronger reason to suspect manipulation than either result alone.
Step 3 — If It’s a Video
For video, I start with WeVerify / InVID. I extract useful keyframes, reverse-search them, inspect available metadata, and investigate the video’s claimed location and timeline.
Then I apply the temporal checks from Day 3. I look for inconsistencies that appear across frames rather than relying on a single still image: facial motion, expressions, blinking, head movement, lighting continuity, lip movement, and other temporal relationships.
Metadata discrepancies can be useful, but I treat them as clues rather than automatic proof. Social platforms and editing software can change or remove metadata, so I always compare technical information with the rest of the evidence.
Step 4 — If It’s Audio
Audio requires a slightly different approach. I start with the listening and prosody checks from Day 4 and pay attention to speech rhythm, breathing, pauses, pronunciation, background consistency, and unusual transitions.
For anything important, I add out-of-band verification. If someone supposedly calls me with an urgent financial request, for example, I don’t try to solve the problem entirely with an audio detector. I independently contact the person through a trusted channel.
That human verification layer is often more useful than trying to obtain certainty from a single automated voice-detection score.
Step 5 — When Provenance Is Unknown
If I don’t know where the content came from, I check for C2PA Content Credentials when available. A valid credential can provide useful information about the asset’s recorded provenance and processing history.
But an unsigned file does not mean a fake file. If no credentials are available, I simply move to the appropriate image, video, or audio workflow above.
Step 6 — Make the Decision Based on the Evidence
This is where I deliberately avoid a simple “two tools agree, therefore it’s real” rule. Different tools can share limitations, and several tools can be wrong about the same piece of content.
Instead, I classify my conclusion based on the quality of the evidence:
| Evidence Pattern | What I Do |
|---|---|
| Several independent checks support the same explanation | Document the evidence and proceed with greater confidence. |
| One detector flags the content but other checks are inconclusive | Keep the result as a lead and investigate further. |
| Different tools produce conflicting results | Do not force a verdict. Investigate the conflict. |
| An earlier credible source contradicts the current claim | Prioritise provenance and contextual verification. |
| Valid C2PA provenance contradicts the surrounding claim | Examine exactly what the credential establishes and what it does not. |
| High-stakes content with unresolved uncertainty | Pause publication, sharing, or action until an independent verification is obtained. |
My High-Stakes Rule
When the consequences are serious — publishing a major allegation, sharing potentially damaging content, approving a financial transaction, or making another consequential decision — I don’t accept “the detector says it’s probably fine” as sufficient verification.
I want independent corroboration. That might mean finding the original source, contacting the person through a trusted channel, obtaining verified provenance, comparing against an authoritative recording, or having another qualified reviewer examine the evidence.
The exact requirement depends on the situation. The principle doesn’t change: the higher the consequence, the stronger and more independent the evidence should be.
The Workflow I Want You to Remember
Image: Hive → FotoForensics → TinEye/Google → visual checklist → C2PA when available.
Video: Hive where useful → WeVerify/InVID → keyframes → provenance → temporal analysis → C2PA when available.
Audio: listening/prosody → independent verification → supporting detection tools where appropriate.
Unknown source: preserve the original → check provenance → identify the content type → follow the relevant workflow.
And the most important rule is the simplest one: don’t let a number make the decision for you. Use the tools to gather evidence, understand what each result actually means, identify contradictions, and then make a documented assessment based on the whole picture.
Every tool stack has gaps. Understanding the gaps tells you what a sophisticated attacker exploits — and therefore what signals matter most when tools give uncertain results. This is the exercise that separates practitioners who know their tools from practitioners who trust their tools blindly.
- Review each of the six tools. For each, identify: what type of deepfake evades this tool most reliably? Write it down for all six.
- If you were creating a deepfake specifically to evade the free stack, which single creation step would reduce detection probability most? Would it be higher-quality generation, careful metadata scrubbing, using a novel model the tools haven’t been trained on, or something else?
- Identify one verification technique that can’t be evaded by any technical deepfake improvement. Hint: it’s not a tool. What is it?
- Given perfect deepfakes will eventually exist — models that pass every automated detection consistently — what does that mean for verification methodology going forward? Do you rely more on tools, or more on provenance and protocol?
- Write your one-line rule for handling ambiguous tool results — the times two tools agree and one disagrees, or all three land in the uncertain zone.
Build your personalised detection workflow document — a written reference you can pull up any time suspicious content arrives. This is the deliverable that converts today’s course content into a permanent personal resource. Not a mental note. A document, saved somewhere you can access in 30 seconds.
- Create a document in whatever tool you’ll actually use — Notes app on your phone, a Google Doc, a note in Obsidian or Notion, a plain text file on your desktop. What matters is that you can open it in seconds when you need it.
- Build your quick check under 60 seconds. Which single tool do you run first? Which single human check do you run alongside? Write both down as a two-step recipe.
- Build your full check under 5 minutes. For images, which tools in what order? For video, which tools? For audio, which checks? Three separate mini-workflows in the same document.
- Write your decision rules. At what tool result or checklist output do you decide “fake,” “real,” or “need more evidence”? Be specific with numbers — “Hive above 80 percent equals fake” is better than “Hive high equals fake.”
- Add your high-stakes rule. For content you’d share publicly or make a significant decision based on, what minimum verification level do you require? C2PA-signed? Multiple tools agreeing? Verified original source? Write your threshold.
Questions and Answers
Can I build my own detection tool if the free ones aren’t enough?
Yes, but the effort-to-value ratio rarely justifies it for individuals. Building a competitive image-detection tool requires access to a labelled dataset of AI-generated and real images (millions of examples), significant compute for training a classifier, and ongoing retraining as new generation models appear. Academic research is publicly available — Hugging Face hosts many open-source detection models you can run locally with modest hardware. For most beginners, using the free stack strategically outperforms building custom tools by any reasonable measure. If you’re specifically doing this for a job — journalism, content moderation, fraud investigation — the paid professional tools (Sensity AI, Truepic, Deeptrace) provide better ROI than DIY.
Are paid detection tools significantly better than the free stack?
Meaningfully better for high-volume professional use, marginally better for individual use. Paid tools like Sensity AI, Truepic, and Deeptrace offer API access, faster processing, better model coverage across newer generation systems, and integrated workflows for enterprise use cases. Accuracy improvements are typically 5 to 15 percentage points over free tools — meaningful at scale, less noticeable for occasional individual use. If you’re processing hundreds of items daily, paid tools pay for themselves. If you’re occasionally checking suspicious content, the free stack combined with the manual checklist gets you 90 percent of the value at zero cost.
I’m a journalist — is there a more professional workflow than what today covers?
The workflow scales up cleanly. Add these professional layers: Reuters or AP’s internal verification tools if you have access; the Bellingcat online research toolkit for OSINT verification; Google Fact Check Explorer for prior-verification lookups; the First Draft verification framework as your methodology backbone. Serious verification desks combine the free tools you learned today with paid platforms and human expert consultation. But the free stack remains the operational core — even at major outlets, most verifications are done with browser-based tools because they’re fastest. Speed matters when you’re on a publishing deadline, and the free stack is fast.
What is the C2PA “Inspect” button I see on some Adobe products?
That’s the built-in C2PA verification interface. Adobe was one of the founding members of the C2PA standard and integrated verification directly into Photoshop, Lightroom, and other Creative Cloud tools. Click Inspect on any C2PA-signed image and you see the same provenance chain that contentcredentials.org/verify would show — creator identity, capture device if hardware-signed, edit history, any AI generation applied. Adobe’s own Firefly AI outputs are always C2PA-signed by default, and the Inspect button is how you distinguish AI-generated Firefly output from photographic content in the same interface. If you use Adobe tools, the Inspect button is your fastest C2PA check.
How do I keep this stack current as tools change and improve?
Two habits I recommend. First: bookmark contentauthenticity.org and the C2PA blog to follow adoption news, which changes fastest. Second: revisit the free tool stack every six months. Hive Moderation improves its models roughly quarterly. WeVerify releases extension updates several times a year. New tools appear — the deepfake detection space has been active enough that a promising new free tool typically emerges every 12 to 18 months. Your workflow document from Exercise 3 should be revisited at the same six-month cadence. Old workflows optimised for tools that have improved or been superseded aren’t worth trusting.
Do these tools handle images in messenger apps that strip metadata?
Partially. Messenger apps like WhatsApp, Signal, and Telegram aggressively strip metadata during forwarding — which limits WeVerify’s metadata forensics on content that reached you through these channels. What still works: Hive, FotoForensics ELA, reverse image search, and C2PA all operate on the image content itself rather than metadata, so they continue to function normally. What doesn’t work: metadata-based provenance checking, GPS verification, device identification. If you can get the original file directly from the sender before it went through a messenger, the full metadata is preserved. If you only have the messenger-forwarded version, adjust your workflow — skip the metadata checks and rely more heavily on the content-based tools plus the human checklist.
Further Reading
- AI Deepfake Hub — the full SecurityElites deepfake library
- WHOIS Lookup Tool — verify who owns domains spreading suspicious content
- How to Spot AI Deepfakes 2026 — the reference article that complements this course
- Content Authenticity Initiative — the C2PA standard documentation and adoption tracker
- FotoForensics — the ELA tool used in today’s workflow